

If you’re anything like us, then your iPhone is almost a part of you, something you check every 10 minutes if not more. Every device, including an iPhone, comes with its own private IP address, as well as a public IP address from the network router it’s connected to.
Your iPhone’s IP address changes regularly because it uses a dynamic IP address instead of a static IP address. The difference between a dynamic IP address and a static one is that the dynamic one changes while static ones always stay the same. That’s why we’re going to show you how to find your iPhone’s IP address in less than 30 seconds. This way you can verify it whenever you need to. Let’s dive in.
Why Knowing Your iPhone’s IP Address Matters
Knowing your iPhone's IP address can protect your privacy and help you troubleshoot network issues. When you use a virtual private network (VPN), it hides your IP address. If you're not using a VPN to protect your digital footprint, check out the best VPNs that work seamlessly with iPhones.
How to Find Your iPhone’s IP Address
You don’t need a third-party app. Finding your iPhone’s IP address is built into iOS. It’s just a few taps away in your settings.
>> Learn More: Best iPhone Parental Control Apps in 2026
How to Find Your iPhone's IP Address Manually
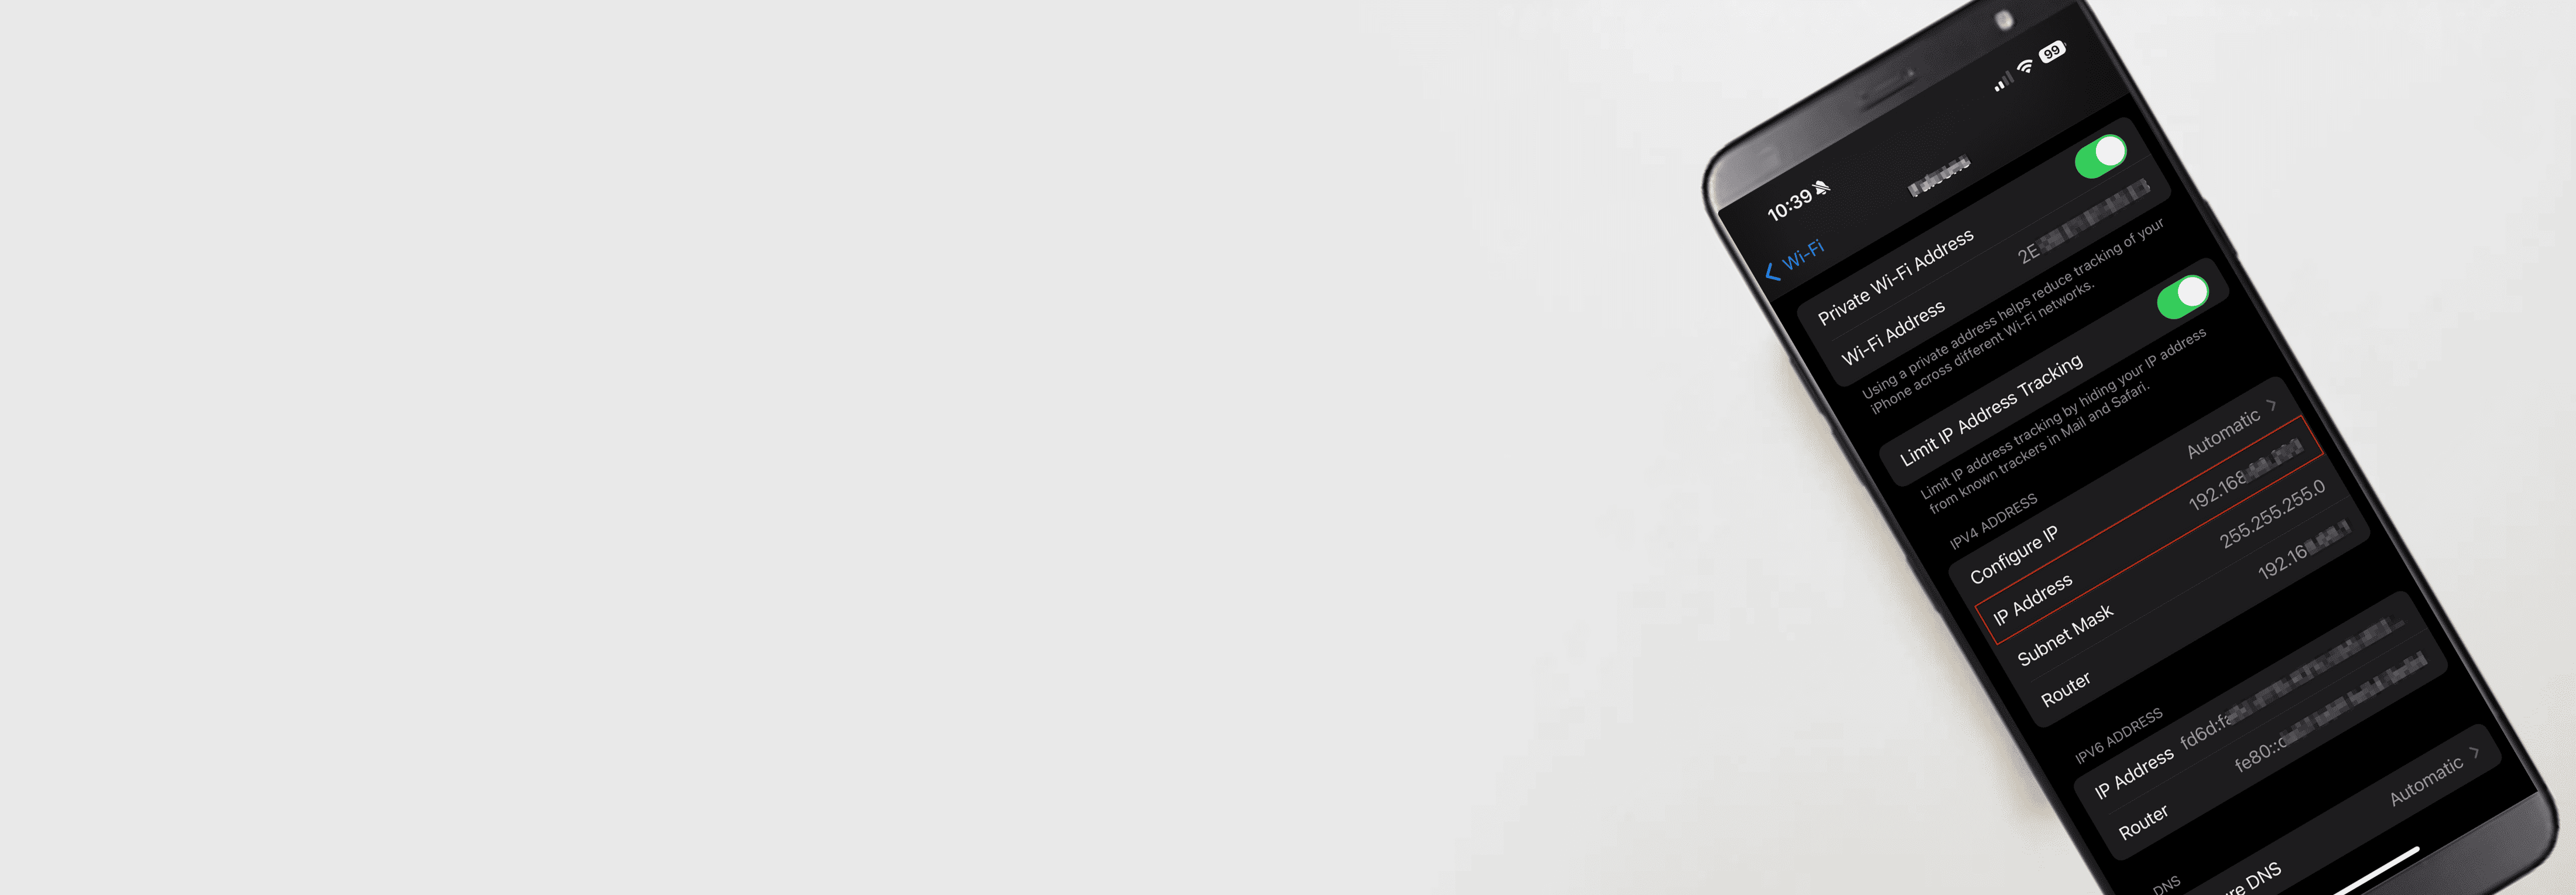
- Go into Settings.
- Click on Wi-Fi.
- Scroll down to the lowercase i, which stands for Information, next to the Wi-Fi network you’re connected to currently.
- Scroll down to IPv4 Address. Your IP address will be displayed there.
Pro Tip: On iOS 15 and later, you might also see an IPv6 address listed. Both are valid IP addresses, but IPv4 is more commonly used for most home networks.

» Further Reading: How to change your iPhones location
Without Wi-Fi
When you’re using cellular data instead of Wi-Fi, finding your IP address requires a different approach. You can configure a custom IP address for when you reconnect to Wi-Fi networks. Here’s how:
- Go into Settings.
- Click on Wi-Fi.
- Scroll to your Wi-Fi network and click the lowercase i in the circle.
- Under IPv4 Address, click Configure IP.
- Click Manual.
- Enter your new IP address.
- Hit Save.

Related Reading: Best VPNs for iPads
Public vs. Private
Understanding the difference between public and private IP addresses is essential for network security. Your private IP address (like 192.168.1.5) identifies the device on your home network. Your public IP address is what websites and online services see when you connect to the internet.
So when you use a VPN to change your IP address, it hides your public IP address from view, replacing it with one from the server you’re connected to. Your private IP address remains unchanged because it’s only visible within your local network.
Private IP addresses are assigned by your router to each device on your network. Public IP addresses come from your internet service provider (ISP). This means all devices on your home network share the same public IP address and have unique private ones.

FYI: Public IP addresses are also called “external” IP addresses. Private IP addresses are known as “internal” or “local” IP addresses.
What Can Someone Do With Your IP Address?
Now that you’ve found your IP address, you might be wondering what would happen if it got into the wrong hands. What could someone do with an IP address?
An IP address also reveals your approximate geographic location. It’s typically your city and ZIP code. This might seem harmless, but cybercriminals can use this information with data from social media, public records, and data breaches to build a detailed profile. With enough PII, or personally identifiable information, they could steal your identity.
Beyond identity theft, here are some of the other risks of exposing your IP address:
- You may receive intrusive targeted advertisements and spam based on your location
- You may be hit with a DDoS attack
- Streaming services or online games might block your access based on geographic restrictions
- Employers or network administrators can monitor your browsing activity
- Copyright holders might pursue legal action for alleged infringement
Your private information
My IP Address
IP:
Loading…
Status:
Unprotected
My IP Information
Internet provider:
Loading…
City:
Loading…
Region/ State:
Loading…
Browser name:
Loading…
Browser version:
Loading…
Device brand:
Loading…
Device type:
Loading…
Latitude:
Loading…
Longitude:
Loading…
Postal code:
Loading…
How to Protect Your IP Address
The most effective way to protect your IP address is by using a reputable VPN service. Here’s how to set up a VPN on your iPhone:
- Choose a VPN from one of the best VPNs, ideally one of the best iPhone VPNs.
- Choose a subscription plan.
- Sign up for an account.
- Go to the App Store.
- Search for the VPN.
- Download the VPN.
- Go through the installation process.
- Once the VPN is installed on your iPhone, open the app.
- Sign in with your username and password.
- Choose a server to connect to.
- Click Connect.

>> Related Reading: The Best Password Managers for iPhone
For comprehensive digital security, combine your VPN with antivirus software and identity theft protection services. When we tested Aura, we were impressed to get all three services in one subscription
NOTE: After connecting to your VPN, we recommend verifying it’s working by checking your IP address. Visit a “what’s my IP” service to confirm your real IP address is hidden and showing the VPN server’s location instead.
Recap
You can also apply similar steps to how to find your computer’s IP address or how to find your Mac’s IP address. The process is nearly identical across devices, with only minor differences in menu labels. Knowing how to check your IP address keeps you informed about your online privacy and verifies when security measures like VPNs are working correctly.

For more information, check out our VPN how-to hub, which has links to all of our VPN-related guides. With step-by-step instructions prepared by our VPN experts, anyone can get through every step of the process, from choosing a VPN to adjusting its settings.
Frequently Asked Questions
Still have questions? We've got answers to the most common queries about iPhone IP addresses below.
-
Does my iPhone have an IP address?
Yes, your iPhone has an IP address, much like any other internet-connected device. You can find it in your phone’s settings.
-
How do I find the IP address for my iPhone without Wi-Fi?
To configure an IP address for your iPhone when not on Wi-Fi, you’ll need to manually set one for when you reconnect:
- On your phone’s home screen, tap Settings.
- Tap Wi-Fi.
- Click on the lowercase i next to your Wi-Fi network.
- Click Configure IP under the IPv4 address section.
- Click Manual.
- Enter your new IP address.
-
Can I change the IP address of my phone?
Yes, you can change your iPhone’s IP address by connecting to a VPN, using a proxy server, or manually configuring it in your network settings. We recommend using VPNs, as they are the easiest and most secure method.
-
How do I know if my IP address is public?
You can tell if your IP address is public by going to https://www.security.org/vpn/whats-my-ip-address/ and comparing it with the IP address in your settings. If there’s a match, then your IP address is public.
-
Does my iPhone’s IP address show my location?
Your IP address reveals your approximate location (city and region) but not your exact street address. However, this geographic information, combined with other online data, could compromise your privacy. That’s why we recommend protecting your IP address with a VPN.