

the security.brief
Learn how to set up a VPN on Mac easily using apps like NordVPN, Surfshark, or Private Internet Access. Enjoy encrypted, private browsing!
These days, privacy is hard to come by, but VPNs are a great way to stay private online. When we’re using our Macs, either for sensitive journalistic research or for shopping online, we don’t want our internet service provider to know our every move. Using a VPN encrypts your connection and keeps your internet activity private, while also making you appear in a different location than where your server currently is.
While it might sound nuanced or complicated to set up a VPN on your Mac, it’s actually quite the opposite. In this article we’ll go over how to do it using a few different methods – all easy. We’ll also share pros and cons to using a VPN on your Mac and also why you should use one more often than not.
Step 1: Choose Your VPN
Unless you can afford to set up your own VPN server and create an encrypted network, you’ll need to choose a VPN for your Mac first. Most of us don't have the technical expertise or resources for that, so luckily there are plenty of options to choose from. Having tested dozens of VPNs, we can confidently say that some of the best options for Mac users are the following:
How to Set up a VPN on Macs
So you’ve chosen a VPN, now what? The next step is setting up the software. The easiest way to set up a VPN on your Mac is to download the VPN app itself. However, there are a few other ways to do this and we’ll show you how.
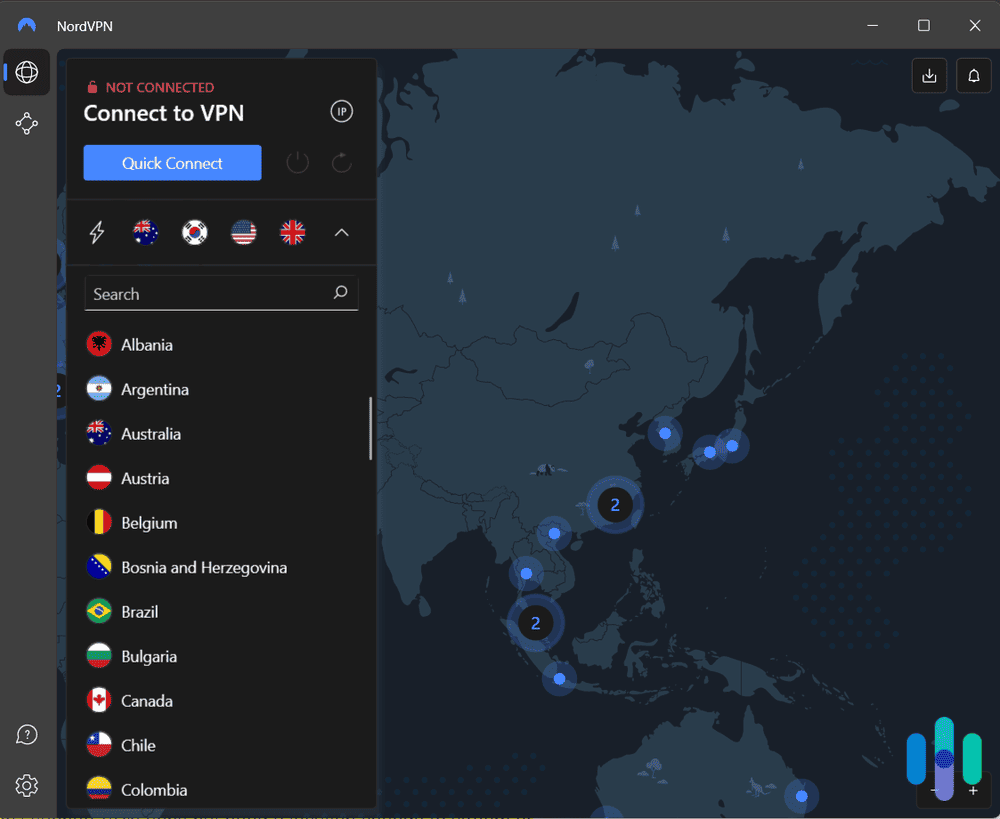
VPN App
When we test out VPNs, we always download the VPN’s app for macOS onto our testing MacBook, and this is by far the most straightforward method.
- Pros: VPN apps let us connect to servers with one click and change servers with another click (think of it like Amazon’s 1-Click Ordering, but for VPNs). VPN apps, aside from being easy to set up and use, also come with kill switches that shut down all web browsers and apps if the connection fails.
- Cons: Not every VPN will have apps for all of your devices, although most, if not all, have macOS apps.
- How to set up:
- Download the VPN app either through the app store or from the VPN’s website directly.
- Sign up for an account.
- Sign in to the app.
- Connect to the server of your choice.

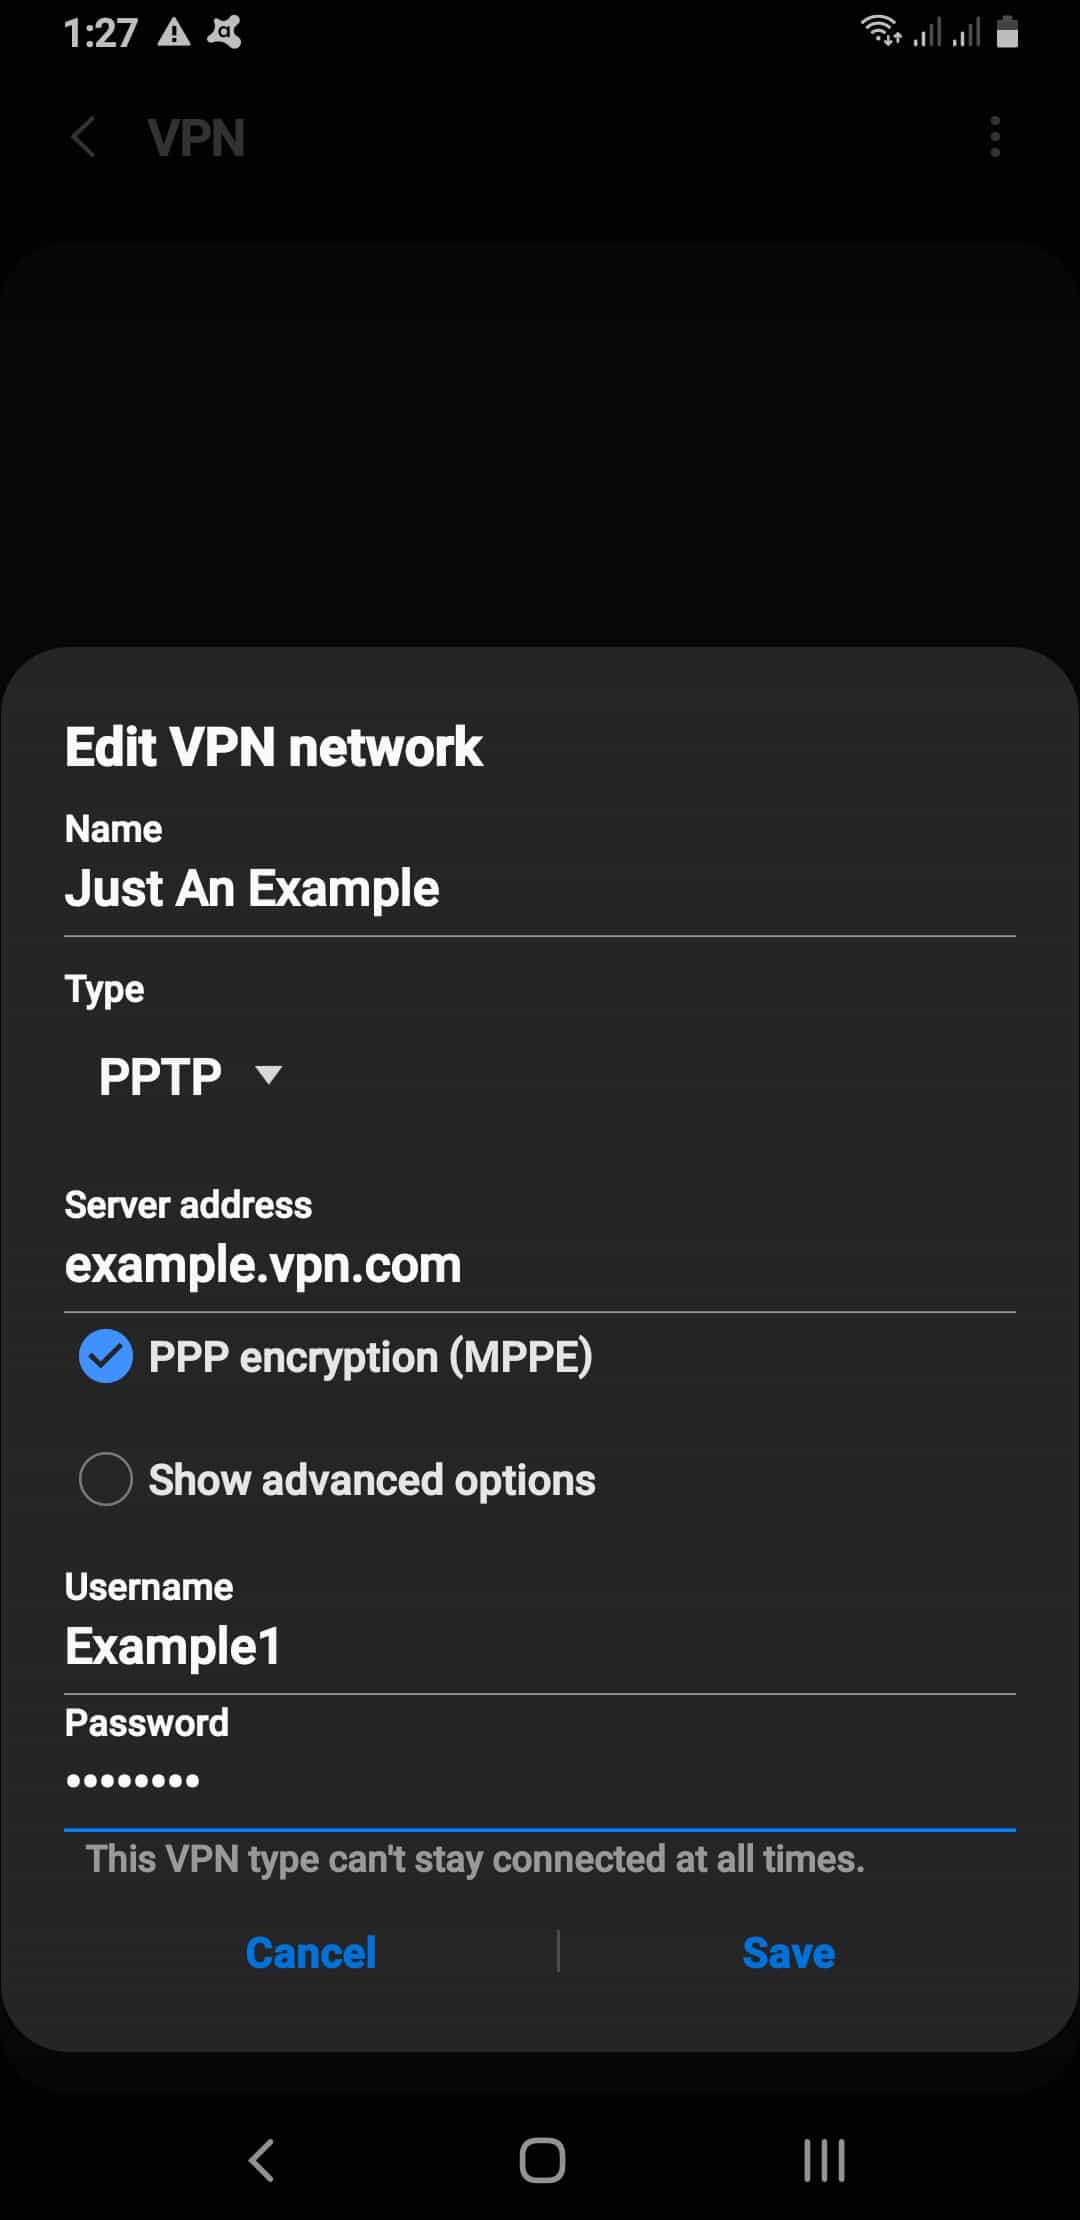
Manual Configuration
Some people may not need a VPN to encrypt their web activity and Mac IP address. Instead, they may want to connect to a private network remotely, like that of a school or business. Manually configuring your Mac to be on a private network isn’t the easiest of processes, but we’ll go over its pros and cons anyway.
- Pros: If you’re on a device that doesn’t work with your VPN app, manual configuration is an option. It lets you connect to a private network even if your device isn’t compatible with any apps (although that should never be the case if you’re on a Mac).
- Cons: Manual configuration takes a little bit to set up and connect to. It also lacks a kill switch, so it’s not as secure as VPN apps.
- How to set up:
- Go to your Mac’s System Settings app.
- Hit Network.
- Click the plus sign.
- Click on Interface.
- Click on VPN.
- Choose which VPN connection you want to set up.
- Click Create.
- Choose a protocol. A word on the different types of VPN protocols:
- IPsec: IPsec secures internet connections, either encrypting the entire data packet (tunneling mode) or just the data packet’s message (transport mode).
- IKEv2: IKEv2 is what reconnects the computer to the network if the VPNconnection is lost.
- L2TP: L2TP, typically combined with IPsec, generates the tunnel through which the encrypted data passes.
- Enter your server address and account name.
- Click Authentication Settings.
- Enter the information from the private network’s administrator.
- Click Advanced to enter in additional information such as server options, DNS servers, proxies, or TCP/IP settings.
- Click Apply.
- Click OK.

OpenVPN
OpenVPN is an open-source VPN that’s highly secure, and it’s our second choice after a regular VPN app.
- Pros: OpenVPN is a secure VPN that can bypass firewalls; it’s also more configurable than VPN apps, for someone who wants to customize their VPN experience.
- Cons: Compared to VPN apps, OpenVPN is hard to set up. It also requires third-party software, and some proxy servers block it, so you may not be able to watch Netflix or other streaming services.
- How to set up:
- Sign in to the OpenVPN Access Server interface.
- Click on the Mac icon.
- Open the installer.
- Click Continue.
- Read the licensing terms.
- Click Continue.
- Click Agree.
- Click Install.
- Enter your Apple ID.
- Click Install Software.
- Once the app is installed, close the installer.
- Move the file to trash.
- Go into your finder and open the OpenVPN app.
- Sign in, and connect.

Browser Extensions
If you’re just using your Mac to browse the internet and not using any other web-connected apps, you may want to opt for a browser extension VPN rather than an app.
- Pros: Browser extensions use less bandwidth than apps, and you can set them up with one click.
- Cons: Some VPNs’ browser extensions log more data than their corresponding desktop apps. Again, they’ll only cover browsers, not web apps, and they might not be as user-friendly on mobile devices.
- How to set up: Setting up browser extensions on your Mac differs based on which type of browser you use. While Safari is the default browser on Macs, there’s actually no VPN extensions for it. Instead, you need to install the VPN app on your Mac to use a VPN on Safari. However, you can use a Chrome VPN extension on your Mac. Here’s how:
- Go to the Chrome Web Store.
- Search for the VPN.
- Click on it.
- Click Add to Chrome and it will download.
- Sign in.
- Connect to encrypt your browser and Mac IP address.

How to Choose a VPN for Mac
In our best VPNs for Mac article, we listed the VPNs that worked the best on our MacBook Pro, but if you want to do a little digging yourself, here’s what to keep in mind.
Features to Look For
- High app ratings: Of course, make sure the app has a rating of over four stars in the app store. If you’re using a browser extension, check its ratings as well.
- Privacy: If privacy is a concern of yours, read the VPN’s logging policy to make sure it’s not keeping a record of your websites visited or your Mac IP address. Also look for a VPN based in a Five Eyes nonmember country. The VPN should use AES-256 encryption.

- Security: Although most of the VPNs we’ve tested have them, make sure your Mac VPN has a kill switch. For more security, look for a VPN with multihop encryption, meaning that it encrypts data a few times through multiple servers. Some people may want split tunneling, which lets them access public and private networks simultaneously. Finally, look for a VPN with dynamic IP addresses rather than static.
- Speed: Especially if you want a VPN for streaming, speed is important. In particular, latency is important if you are using a VPN for gaming. If the VPN has a free option, perform some speed tests to see how it performs.

- Entertainment: Whether you’re using your MacBook to watch Netflix, Hulu, Prime Video or Disney+, look for compatible VPNs. Not all VPNs work with all streaming services, as VPNs sidestep the licensing agreements that differ by country. Read how to watch Netflix with a VPN for more information.
- Cost: There’s no reason to spend more than $15 a month on a VPN, but we recommend paying for a subscription rather than using a free VPN. Free VPNS typically have limits on speed, data usage, device usage, etc., so they’re not good for streaming or torrenting. Free-trial VPNs, on the other hand, usually have all of the features of the premium service for a limited time. They’re a great way to test out the VPN for yourself, performing speed tests as well as DNS and WebRTC leak tests.
Did You Know: Run speed tests with and without your VPN connected to see how much it slows down your computer. Plus, check out our article on how we ran speed tests to compare different VPN speeds. The results might surprise you!
Aside from the bottom line, make sure that your VPN subscription covers all of the devices you’d like to connect, as well as the number of simultaneous connections you plan to use. Also, look into money-back guarantees and contract lengths; typically, the longer you sign up for, the more you’ll save on a monthly basis.
Free vs. Paid Mac VPNs
Let’s talk more about cost. While there are several free VPNs for Mac, many of them have limits that may make them not worth it, such as:
- Data: Many free VPNs have daily or monthly limits on the amount of data you can use while connected. For high-bandwidth activities like streaming or torrenting, these may be prohibitive.
- Speed: Some free VPNs limit users in terms of speed, which could be frustrating, as premium VPNs already slow down browsing enough for our liking.

- Servers: You may only be able to connect to a small number of servers, and they may not be in your desired locations. For example, if you’re a journalist in the United Arab Emirates and need a VPN for the UAE, you’ll want access to nearby servers, and a free VPN may not provide it.
- Devices: Most free VPNs work on one device only. If you want to use a VPN solely on one MacBook, that could be fine, but it won’t work if you want a VPN for your iPhone as well.
- Time: Most free VPNs are only available for a limited time, so they’re not good solutions if you want a VPN for long-term use.
While free VPNs may work for some, there are many cheap VPNs that avoid these limits without breaking the bank.
What Is a VPN?
VPNs, if you don’t know by now, are virtual private networks. A VPN’s main purpose is to encrypt a device’s web activity, which includes web browsers and apps. Rather than transmitting data directly from a device to an internet service provider, VPNs create encrypted tunnels so that the data is hidden from view.
According to our annual VPN consumer report, almost half of VPN users cite security as their primary reason for using one. This drives the projected 18 percent annual growth rate in the VPN market for the next five years.1
How to Test Mac VPNs
Aside from researching how they work, we perform three major tests on VPNs: a speed test, a DNS leak test, and a WebRTC leak test. Here’s how to do each:
- Speed:
- Use the speed test from Ookla.
- Test your VPN’s download speed, upload speed, and latency, while connected to the internet.
- Test your VPN’s download speed, upload speed, and latency, while not connected.
- Compare the speeds to see exactly how much your VPN slows you down.
We use a free speed test from Ookla, but there are tons of free options online.
- DNS leaks: To make sure our domain names aren’t being leaked outside of our VPN’s encrypted tunnel:
- Use a test from DNSLeakTest.com.
- Check if there is any change in IP address, when the VPN is connected.
- If there is a change in the IP address, then you will know that there is no leak.
- WebRTC leaks: WebRTC is the default on our preferred web browser, Chrome, and it allows for faster connections while streaming, downloading files, and video chatting. How? By letting browsers know each other’s private IP address, which we do not want to get out. Here is how we check for WebRTC leaks:
- Use the WebRTC leak test on ExpressVPN’s website.
- Note a change in IP address with VPN connected and not connected.
- You can be sure there is no leak if there is a change in the IP address.

How to Sync VPN Settings Across Macs
If you set up your VPN manually, you can sync it across all of your Macs with the following steps:
- Head back to your System Settings.
- Click on Network.
- Click on the three dots (the action pop-up menu).
- Select Import Configurations.
- Select your file.
- Click Import.
Note: You’ll need to manually import your VPN settings on each Mac you have; there’s no way to sync multiple computers at once.
How to Share Mac VPNs Over Wi-Fi
Sharing is caring, and that applies to VPNs as well as friendship. Here are the steps for sharing your VPN connection over Wi-Fi:
- Plug your MacBook to the internet using an Ethernet cable rather than Wi-Fi.
- On your Mac, go to System Settings.
- Click on Sharing.
- Click on Internet Sharing.
- Choose your VPN under Share Your Connection From and to Computer Using.
- Check the box for Wi-Fi.
- Under the Wi-Fi options, create a password and a network name.
- Leave the channel as the default.
- Change the security to WPA2 personal.
- Click OK to enable internet sharing.
- Turn the Wi-Fi network on and click Start.
- Now, people will be able to find your Wi-Fi network and join it with the password.

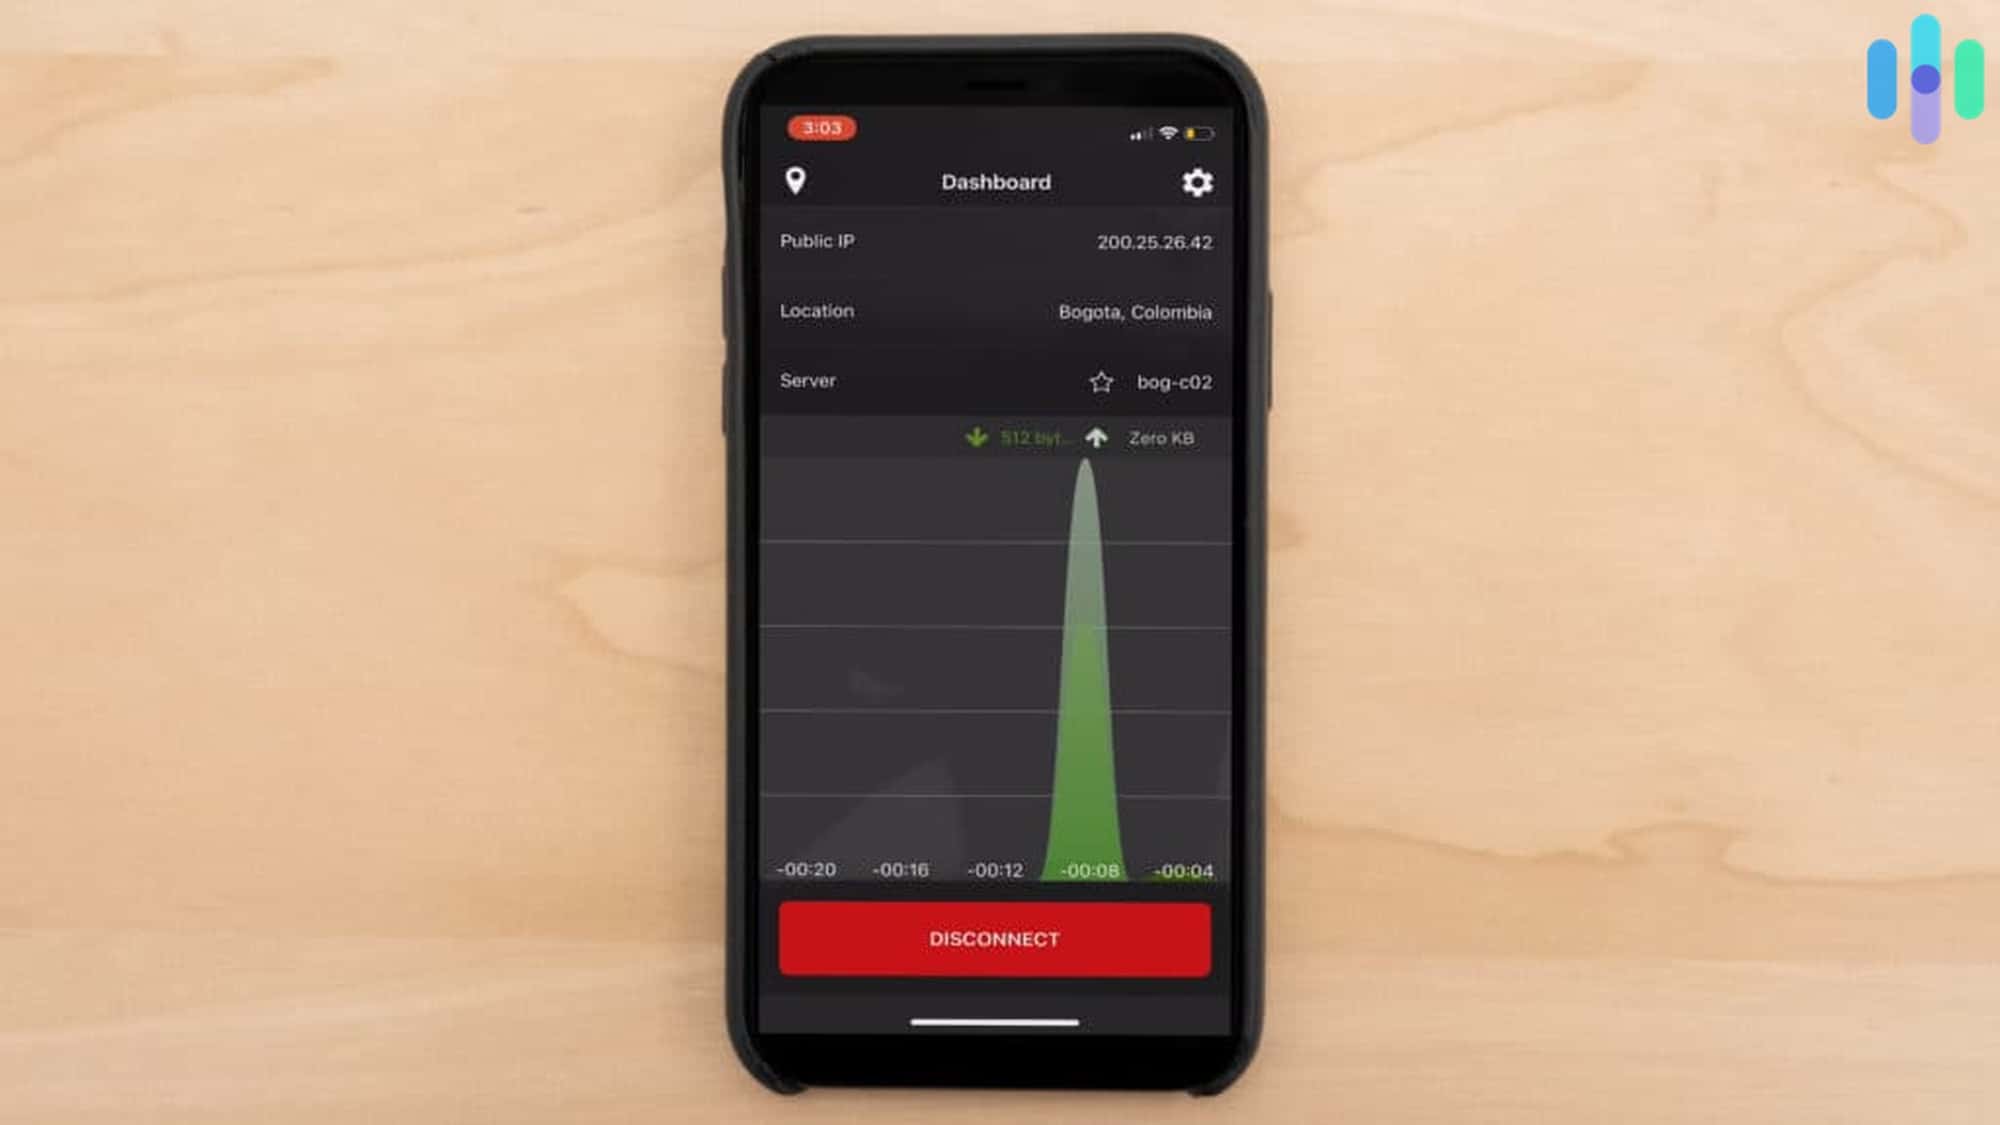
How to Change VPN Region on Macs
To change your VPN region, go to the VPN app and connect to another country’s server. Now, your internet service provider will think you’re in a different country, based on your replaced IP address.
>> Read Next: How To Change Your IP Address
How to Uninstall Mac VPNs
To uninstall your Mac VPN, you need to:
- Find the app in Finder.
- Drag it to the trash, which may require your administrator credentials.
- Completely delete the app and empty the trash.
Do Macs Have VPNs Built in?
Although Macs let us connect to private networks without a VPN app, these networks aren’t VPNs in the traditional sense. While they are different from connecting directly to Wi-Fi, these private networks don’t encrypt your web activity or device IP address. If that’s what you’re after, then you’ll need a third-party VPN app for your Mac.

What if the Mac VPN Connection Drops?
If your VPN connection drops, then the kill switch will shut down all web apps and browsers so your internet service provider can’t see any of your online activities. After this happens, we recommend that you:
- Turn your Wi-Fi off and on.
- Or, unplug and replug your Ethernet cable to ensure a strong Wi-Fi connection.
Recap
Even though Mac has a smaller market share than Windows (about 18 percent globally), virtually all of the VPNs we’ve tested have apps for Macs.2 VPNs are the quickest and safest way to get more privacy online. The best part? You can get signed up and set up in just a few minutes.
Frequently Asked Questions
After years of testing out Mac VPNs, it’s no surprise that we get so many questions about them.
-
Do Macs have built-in VPNs?
Mac does not have a built-in VPN; however, you can connect to a school or company’s private network from a Mac, if you have the required information.
-
How do I get a free VPN on my Mac?
To get a free VPN on your Mac, download an app like Surfshark or Windscribe onto your computer.
- Create an account.
- Sign in.
- Connect to a server.
-
Should I use a VPN on my Mac?
You should use a VPN on your Mac whenever you’re on a public Wi-Fi network to prevent hacking. They’re also useful for accessing other countries’ streaming libraries or simply for creating more privacy from your internet service provider.
-
What are the best VPNs for Macs?
The best VPNs for Macs are CyberGhost, NordVPN, ExpressVPN, Surfshark, Private Internet Access, and TunnelBear.
-
Is there a downside to always using a VPN?
While there are many benefits to using a VPN, there can be some downsides as well. Using a VPN might increase latency and affect your internet speed, which can make things slower online. Sometimes, using a VPN on social media might get your account blocked for suspicious activity. Additionally, some VPNs can drain battery life on MacBooks faster. Banking apps may also flag VPN usage as suspicious and require additional verification steps.