Best VPNs for Ubuntu in 2025
Featuring enhanced security through multi-hop technology and a minimal reduction in network speeds, NordVPN is our #1 pick for Ubuntu.

- Multi-hop technology enhances Ubuntu security
- Easy tutorial allows for quick installation on Linux devices
- Fast speeds with Ubuntu
- Multi-hop technology enhances Ubuntu security
- Easy tutorial allows for quick installation on Linux devices
- Fast speeds with Ubuntu

- User-friendly and feature-rich GUI
- Easy-access kill switch
- Top-class 256-bit AES encryption with OpenVPN or WireGuard tunneling
- User-friendly and feature-rich GUI
- Easy-access kill switch
- Top-class 256-bit AES encryption with OpenVPN or WireGuard tunneling

- Allows torrenting on servers in more than 110 countries
- Supports port forwarding to increase download speeds
- Has an Ubuntu app with a very intuitive GUI
- Allows torrenting on servers in more than 110 countries
- Supports port forwarding to increase download speeds
- Has an Ubuntu app with a very intuitive GUI
Do you use Ubuntu? While it’s great to support open-source software like Ubuntu, it also means it’s a lot harder to find tools that support your operating system. And finding a VPN is no different. When you consider that Linux only holds 4% of the market share in the world of desktops and laptops,1 it makes sense that most providers prioritize macOS and Windows.
Still, you need one of the best VPNs to stay safe online if your Ubuntu device connects to the internet. Even your security systems aren’t immune to hacking, and many of them run on Ubuntu.2
All of that’s not to say there aren’t any good Ubuntu VPNs around. There are; you just need to do a little more digging to find them. If you don’t have the time for that, stick around. We did our own research and testing to find the six best VPNs for Ubuntu.
Tried and Tested: The Best VPNs for Ubuntu
- NordVPN - Most secure Ubuntu VPN
- Surfshark - Most user-friendly Ubuntu VPN with GUI
- Proton VPN - Best Ubuntu VPN for Torrenting
- ExpressVPN - User-friendly Ubuntu VPN with CLI
- Private Internet Access - Cheap Ubuntu VPN with GUI
- IPVanish - Fast Ubuntu VPN with minimal setup required
How We Tested VPNs for Ubuntu
Full disclosure: We don’t use Ubuntu on the daily, but we have a lot of experience testing software on it. Being one of the easiest distros to set up (not to mention its sizable app repository), we used Ubuntu to test the best Linux VPNs as well as the top antivirus software for Linux.
For all those tests, we focused on Linux overall, but on this page, we’ll be focusing on Ubuntu in particular. We found and tested good VPNs that offer what we would want for an Ubuntu system, namely:
- A user-friendly interface: We’d prefer an app with a graphical user-interface (GUI) over one that uses a command line interface (CLI) any day, but that’s just us. Whichever you prefer, two VPNs in our list offer a GUI, while two others use a CLI. The last offers direct setup via the Ubuntu Network Manager.
- Secure connections: None of that matters, though, if the connections are not secure. All our top picks offer access to VPN connections through open-source VPN protocols, like OpenVPN and WireGuard, while providing strong encryption using the latest industry standards.
- Affordable pricing: Unfortunately, the best VPNs to use for an Ubuntu system aren’t free; a subscription is required to gain access to their user-friendly interfaces and secure connections. That said, we don’t want to spend a fortune, either, just to set up a VPN, so we picked VPNs that are affordable (as low as $2.19 per month).
>> See More: 5 Cheap But Secure VPNs
We tested our top picks on a Windows 11 Acer laptop running the Ubuntu version 23.10.13 mounted on a virtual machine software from Oracle. We bought a subscription for each VPN, followed their respective setup instructions, and tested their connections and features for at least two days each. Here are our findings.
What To Expect From The Top Ubuntu VPNs
| System |
NordVPN

|
Surfshark

|
Proton VPN

|
ExpressVPN

|
Private Internet Access

|
IPVanish

|
|---|---|---|---|---|---|---|
| Ranking | 1st | 2nd | 3rd | 4th | 5th | 6th |
| Ratings | 9.7/10 | 9.5/10 | 9.3/10 | 9.1/10 | 9.4/10 | 9.3/10 |
| Starting monthly price | $3.09 (over 2 years) | $2.49 (over 2 years) | $4.49 (over 2 years) | $8.32 (over 1 year) | $2.19 (over 1 year) | $2.75 (over 2 years) |
| Command line interface (CLI) | Yes | Yes | No | Yes | Yes | Yes |
| Graphical user interface | No | Yes | Yes | No | Yes | No |
| Network Manager setup | Yes | Yes | Yes | Yes | Yes | Yes |
| Works with Ubuntu | All Ubuntu versions | Ubuntu 20.04 or higher | Latest version (25.04) | Ubuntu 20.04 or higher | Ubuntu 18.04 or higher | Ubuntu 20.04 or higher |
| OpenVPN | Yes | Yes | Yes | Yes | Yes | Yes |
| WireGuard | Yes (NordLynx) | Yes | Yes | Yes | Yes | Yes |
| Read Review | NordVPN Review | Surfshark Review | Proton VPN Review | ExpressVPN Review | Private Internet Access Review | IPVanish Review |
-
1. NordVPN - Most Secure Ubuntu VPN
 View Plans Links to NordVPN
Product Specs
Multihop Yes Obfuscated Servers Yes Kill Switch Yes Split Tunneling Yes Netflix Yes Torrenting Yes 
User Experience
We found it odd that NordVPN didn’t have a GUI because it normally has some of the most pretty-looking and functional VPN apps for other platforms. For users of Ubuntu and other Linux distros, however, a CLI is all that’s available.
In fairness, the setup process took less than five minutes. It was actually just one line of command to fetch and install the app from NordVPN’s download page; just make sure you have the curl package.
When it came to using it, we had no trouble performing basic and moderately complex actions like connecting to the VPN, choosing a specific server, or turning features such as Threat Protection on and off. NordVPN keeps a list of Linux commands that we kept bookmarked for reference. It wasn’t as easy to use as Surfshark, for sure, but it wasn’t terribly hard to manage, either.
Security and Privacy
It seems unfair that NordVPN doesn’t offer a GUI for Linux users, but that doesn’t change the fact that it provides top-notch security and privacy through its RAM-only servers, “no-logs” privacy policy, and secure connections tunneled through OpenVPN and WireGuard (via NordLynx). It’s exactly for those things that we consider NordVPN a top-shelf VPN service.
Those features apply to all users, including Linux, so when you connect to NordVPN, you can expect to receive the utmost privacy you could get from a VPN. We enjoyed 256-bit AES encryption, a host of cybersecurity features like Threat Protection that kept ads, malicious websites, and trackers at bay, and effective tunneling that could bypass even the Great Firewall of China. It works on Ubuntu Kylin, too, the official Ubuntu version with a fully Chinese UI.6
>> Also See: VPNs That Can Work In China
Pricing
NordVPN’s top-shelf security and privacy comes at a higher cost than that of Surfshark, but it’s not bank-breakingly high if you purchase a two-year plan. Our NordVPN subscription cost us an average of $3.79 per month. Sometimes you can get up to four months free just by signing up for a one-year or two-year deal. That’s a nice way to sweeten the already sweet pot.
That said, NordVPN puts a limit on the number of devices you can use it on. You can install NordVPN on as many devices as you want, but only six of them can connect simultaneously. Fortunately, there’s a way around that. You can set up a VPN router with NordVPN; a router counts as only one device, and you can connect many devices to it.
>> Related: The Best VPN Routers of 2025
How To Use
To establish a connection or disconnect a NordVPN server, simply type these into the Terminal:
- To connect: nordvpn connect
- To disconnect: nordvpn disconnect
The ‘connect’ function automatically chooses a server for you; if you want to choose a specific server:
- Go to https://www.nordvpn.com/servers/tools/
- Select a country from the dropdown list
- Copy the country code and server number from the left panel (e.g. uk2532)
- Open the Terminal
- Type in “nordvpn connect [country code, server number]” and hit enter. (e.g. nordvpn connect uk2532)
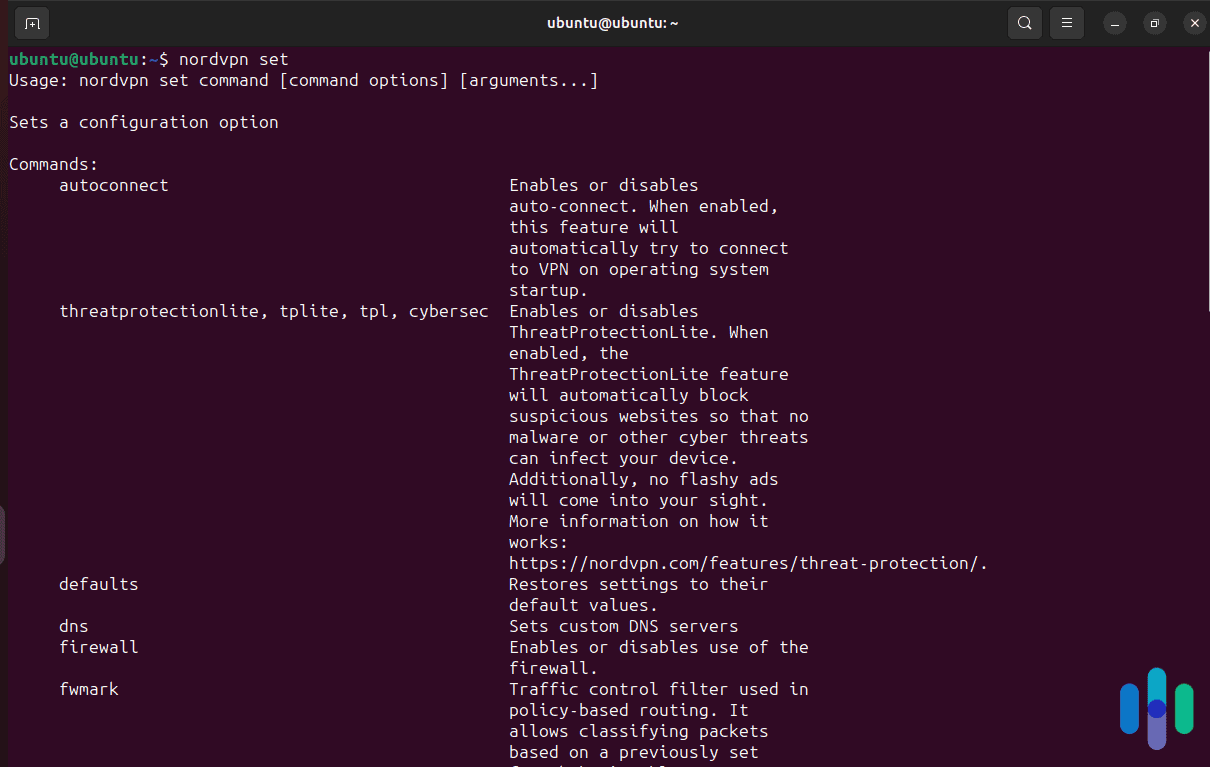
You can also manage the VPN settings by typing “nordvpn set” into the Terminal. From there, you can choose from a number of features you can activate/deactivate, such as auto-connect and Threat Protection, as shown below.
NordVPN Ubuntu settings What We Like
- Easy setup (one command line only if you have all necessary packages installed)
- Affordable long-term pricing
- Open-source Linux app
- Offers some form of split tunneling
What We Don’t Like
- Slightly pricier than Surfshark
- Lack of a GUI
- Limit of six simultaneous connections
Having a CLI, NordVPN was a little harder to manage than Surfshark and Private Internet Access (another Ubuntu VPN with a GUI), but that didn’t limit it from providing a feature-rich VPN to Ubuntu users. For example, it offers some type of multi-hop connection, something that ExpressVPN doesn’t.
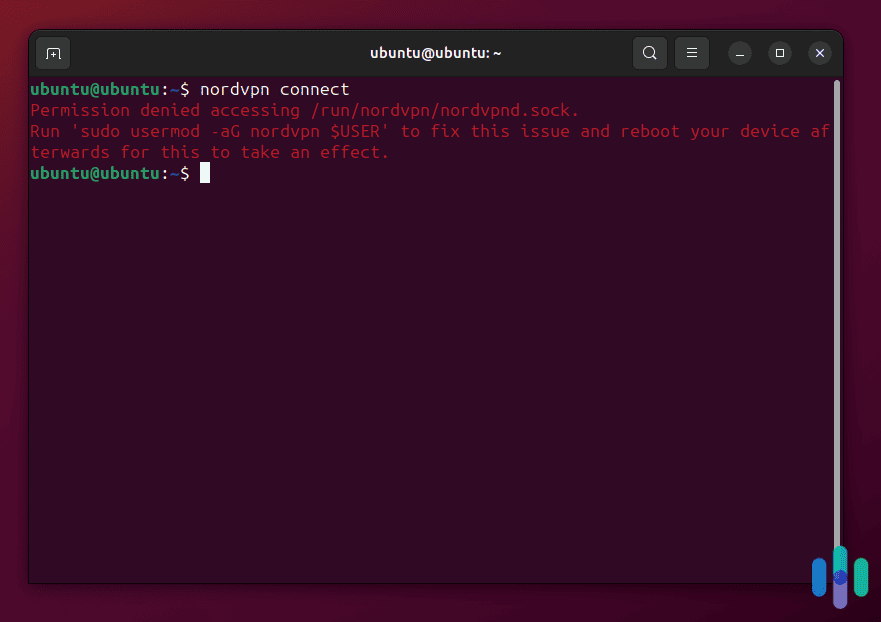
Permission required to connect NordVPN the first time It also allows split tunneling. On Windows, split tunneling lets some apps or websites of your choosing bypass the VPN tunnel so you can use them alongside VPN-connected apps. On Ubuntu, NordVPN’s split tunneling (the “nordvpn whitelist add port/subnet” commands) enables the same, but instead of apps, it creates a split tunnel for network ports and IP addresses. This can have endless applications, like running a torrent server (NordVPN is also one of the best VPNs for torrenting). Much like anything Linux-related, it’s all up to your imagination.
We’d also like to point out that NordVPN’s Linux app has been open-sourced since March 2023, allowing anyone to alter its code for their own use of the app. If that’s something you’re interested in, you can access the entire source code on GitHub.7
-
2. Surfshark - Most User-Friendly Ubuntu VPN with GUI
 View Plans Links to Surfshark
Product Specs
Multi-hop Yes Camouflage Mode Yes Kill switch Yes Split Tunneling Yes Netflix Yes Torrenting Yes 
User Experience
Installing Surfshark on Ubuntu wasn’t quite as easy as setting up a VPN on Windows, but you already knew that, didn’t you? Relative to the other Ubuntu VPNs we tested, though, Surfshark was the easiest to install. It involved three lines of command, and that’s it! After that, the Surfshark GUI appeared in our list of apps.
The GUI looked exactly like the Surfshark Windows VPN (a top-class Windows VPN in our book), minus a few non-VPN features. For example, Surfshark antivirus, secure browser, and Alternative ID were not available. Still, as far as using the VPN goes, there’s no question that Surfshark’s Linux GUI is the most user friendly. We were able to choose a server, set automatic connection rules, and switch tunneling protocols in a snap.
Security and Privacy
Surfshark was more than just a pretty face; it was as functional as VPNs could get, giving us access to thousands of servers in all 100 locations where Surfshark operates. All connections were routed via either OpenVPN or WireGuard, both open-source VPN software, and our VPN traffic was encrypted using 256-bit AES (for OpenVPN) or ChaCha20 (for WireGuard).
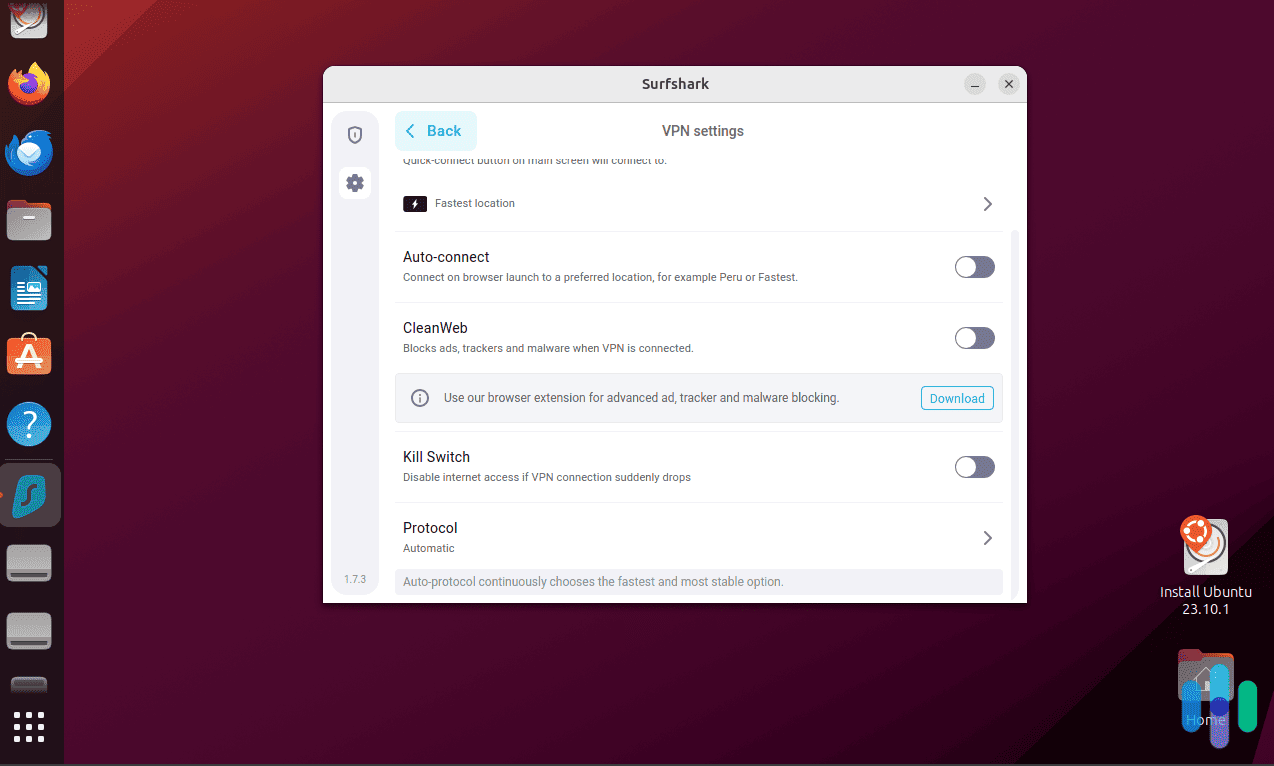
Surfshark Ubuntu features One feature we appreciated having easy access to was the kill switch. Surfshark’s kill switch performs a system-wide network lock whenever the VPN is disconnected. We like keeping the kill switch on to avoid data leak, but for Ubuntu users, that’s something you might want at times, but not other times. For example, when you’re performing crucial system upgrades, you might want to turn the kill switch off to protect unsaved progress in case the VPN disconnects; or if you’re running an Ubuntu home server, you might want to keep it off permanently to keep the server online no matter what.
Pricing
How much did all those benefits from Surfshark cost us? Barely over $2 per month after we signed up for a two-year Surfshark plan. The subscription cost $59.76 – which was around $2.50 per month – without the discounts, but at the time we bought, there was an on-going deal that lowered the price to $55.
Surfshark doesn’t limit how many devices you can connect. That’s perfect if you’re running multiple homemade servers or Ubuntu devices, such as for mining cryptocurrencies, since you can connect all of them to the same Surfshark account.
>> Related: The Best VPNs for Cryptocurrency Trading
How To Use
To connect to Surfshark, simply follow these steps:
- Launch the Surfshark Linux app
- Log in
- Type the location you want to access into the search field or select the ‘Fastest Location’ or ‘Nearest Country’ option
- Click ‘Connect’
What We Like
- Easy to use GUI
- Installs in less than five minutes (depends on network and device speed)
- VPN features, including a kill switch
- Affordable pricing for long-term subscriptions
What We Don’t Like
- Pricey for month-to-month subscribers
- Other Surfshark One features (antivirus, Alternative ID, etc.) are not available
- Connections to some servers can be erratic
Surfshark is a highly-rated VPN with over 3,000 servers in 100 countries around the globe. That’s one of the most widely-dispersed server networks we’ve seen, next only to ExpressVPN’s 105 locations. More importantly, though, we know Surfshark for its impressive security, networking, and privacy.
Surfshark has a verified “no-logs” policy; the “verified” part comes from auditing firms that have performed security audits on its apps and servers. The list includes Cure53 and Deloitte, both members of The Big Four auditing group, who have looked at Surfshark’s apps, server infrastructure, and privacy policy.5 While Surfshark’s Linux app isn’t open-source, submitting them to third-party audits shows commitment to transparency.
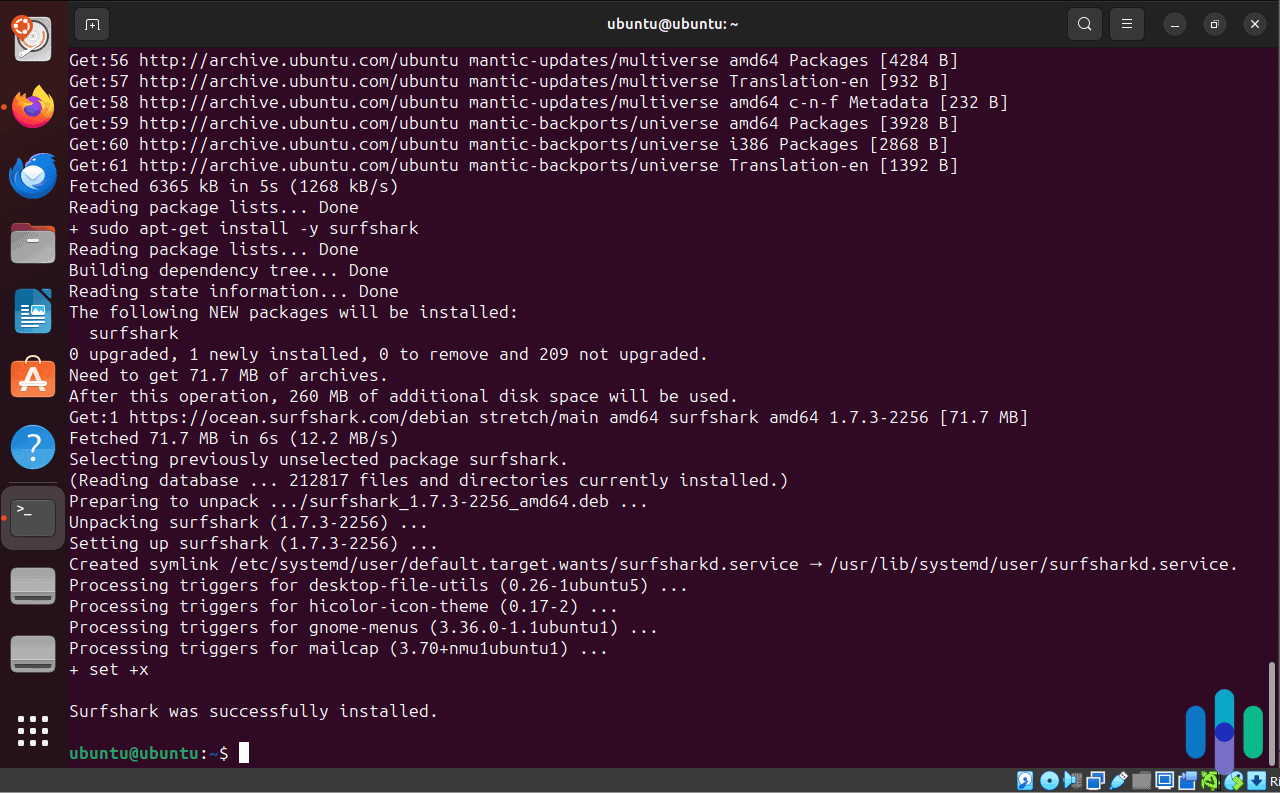
Surfshark installed successfully via Terminal Speaking of transparency, one you might not want so much about Surfshark is that it records IP addresses at the start of each session. We’re fine with this because the IP addresses are stored in an encrypted server, and they are deleted 15 minutes after disconnecting; but if you’re running a machine that’s constantly connected to a VPN, you may want to set it to refresh its connections occasionally.
Overall, though, we think Surfshark is a secure VPN for most Ubuntu users. It’s super user-friendly, and the Linux app offers about the same features as the Windows and macOS apps.
>> Also See: The Best macOS VPNs
-
3. Proton VPN - Best Ubuntu VPN for Torrenting
View Plans Links to Proton VPNProduct Specs
Multi-hop Yes Camouflage Mode Yes Kill switch Yes Split Tunneling Yes Netflix Yes Torrenting Yes User Experience
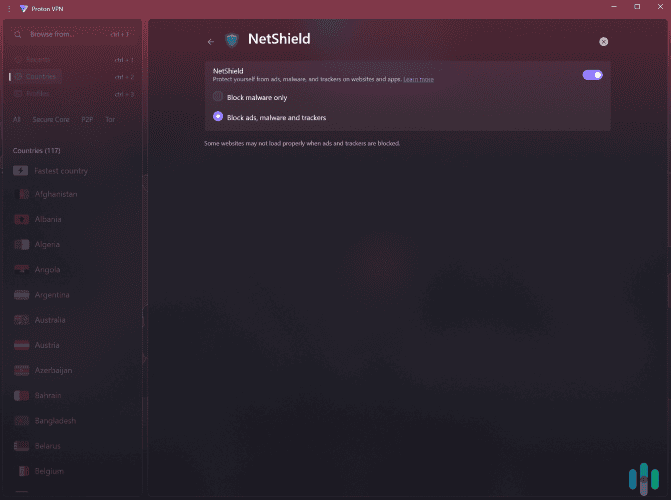
Ubuntu users get access to NetShield, a great ad-blocking tool. Proton VPN’s Ubuntu app is very easy to install and use, as it comes with a GUI. The app design is really intuitive, and the interface is simple to navigate — it usually took us under five seconds to find a specific feature or connect to a server.
The Ubuntu app is also feature-rich, as it has “NetShield” and “VPN Accelerator.” “NetShield” blocks ads, trackers, and malicious websites, and “VPN Accelerator” increases performance across all VPN servers.
Test Results: To see how good “VPN Accelerator” is, we disabled the feature (it’s enabled by default). We noticed that it generally improves speeds by up to 50 percent.
Security and Privacy
In addition to an ad-blocker, Proton VPN also secures user data with Full-Disk Encryption (FDE). It’s enabled across all servers, ensuring that data can’t be compromised even if a server is somehow compromised.
Proton VPN also offers high-end privacy — it has a strict, independently-audited no-logs policy, and an open-source Ubuntu app. The app has also passed a security audit, confirming it’s 100 percent secure.
Feature Highlight: Proton VPN’s Ubuntu app also has “Secure Core” servers, which send your data through an additional server located in a privacy-friendly country.
Pricing
Proton VPN has two paid tiers: “VPN Plus” and “Proton Unlimited.” “VPN Plus” includes all VPN features, and “Proton Unlimited” adds additional services, like Proton Mail and Proton Pass. We recommend “VPN Plus” for Ubuntu users interested in torrenting — with the longest plan, it costs $4.49 per month.
All plans come with a 30-day refund, but it’s prorated — so, it only covers the unused portion of your subscription. Proton VPN also has a free plan with unlimited data, but it doesn’t support torrenting or streaming.
>> Read More: How Much Does Proton VPN Cost in 2025?
How To Use
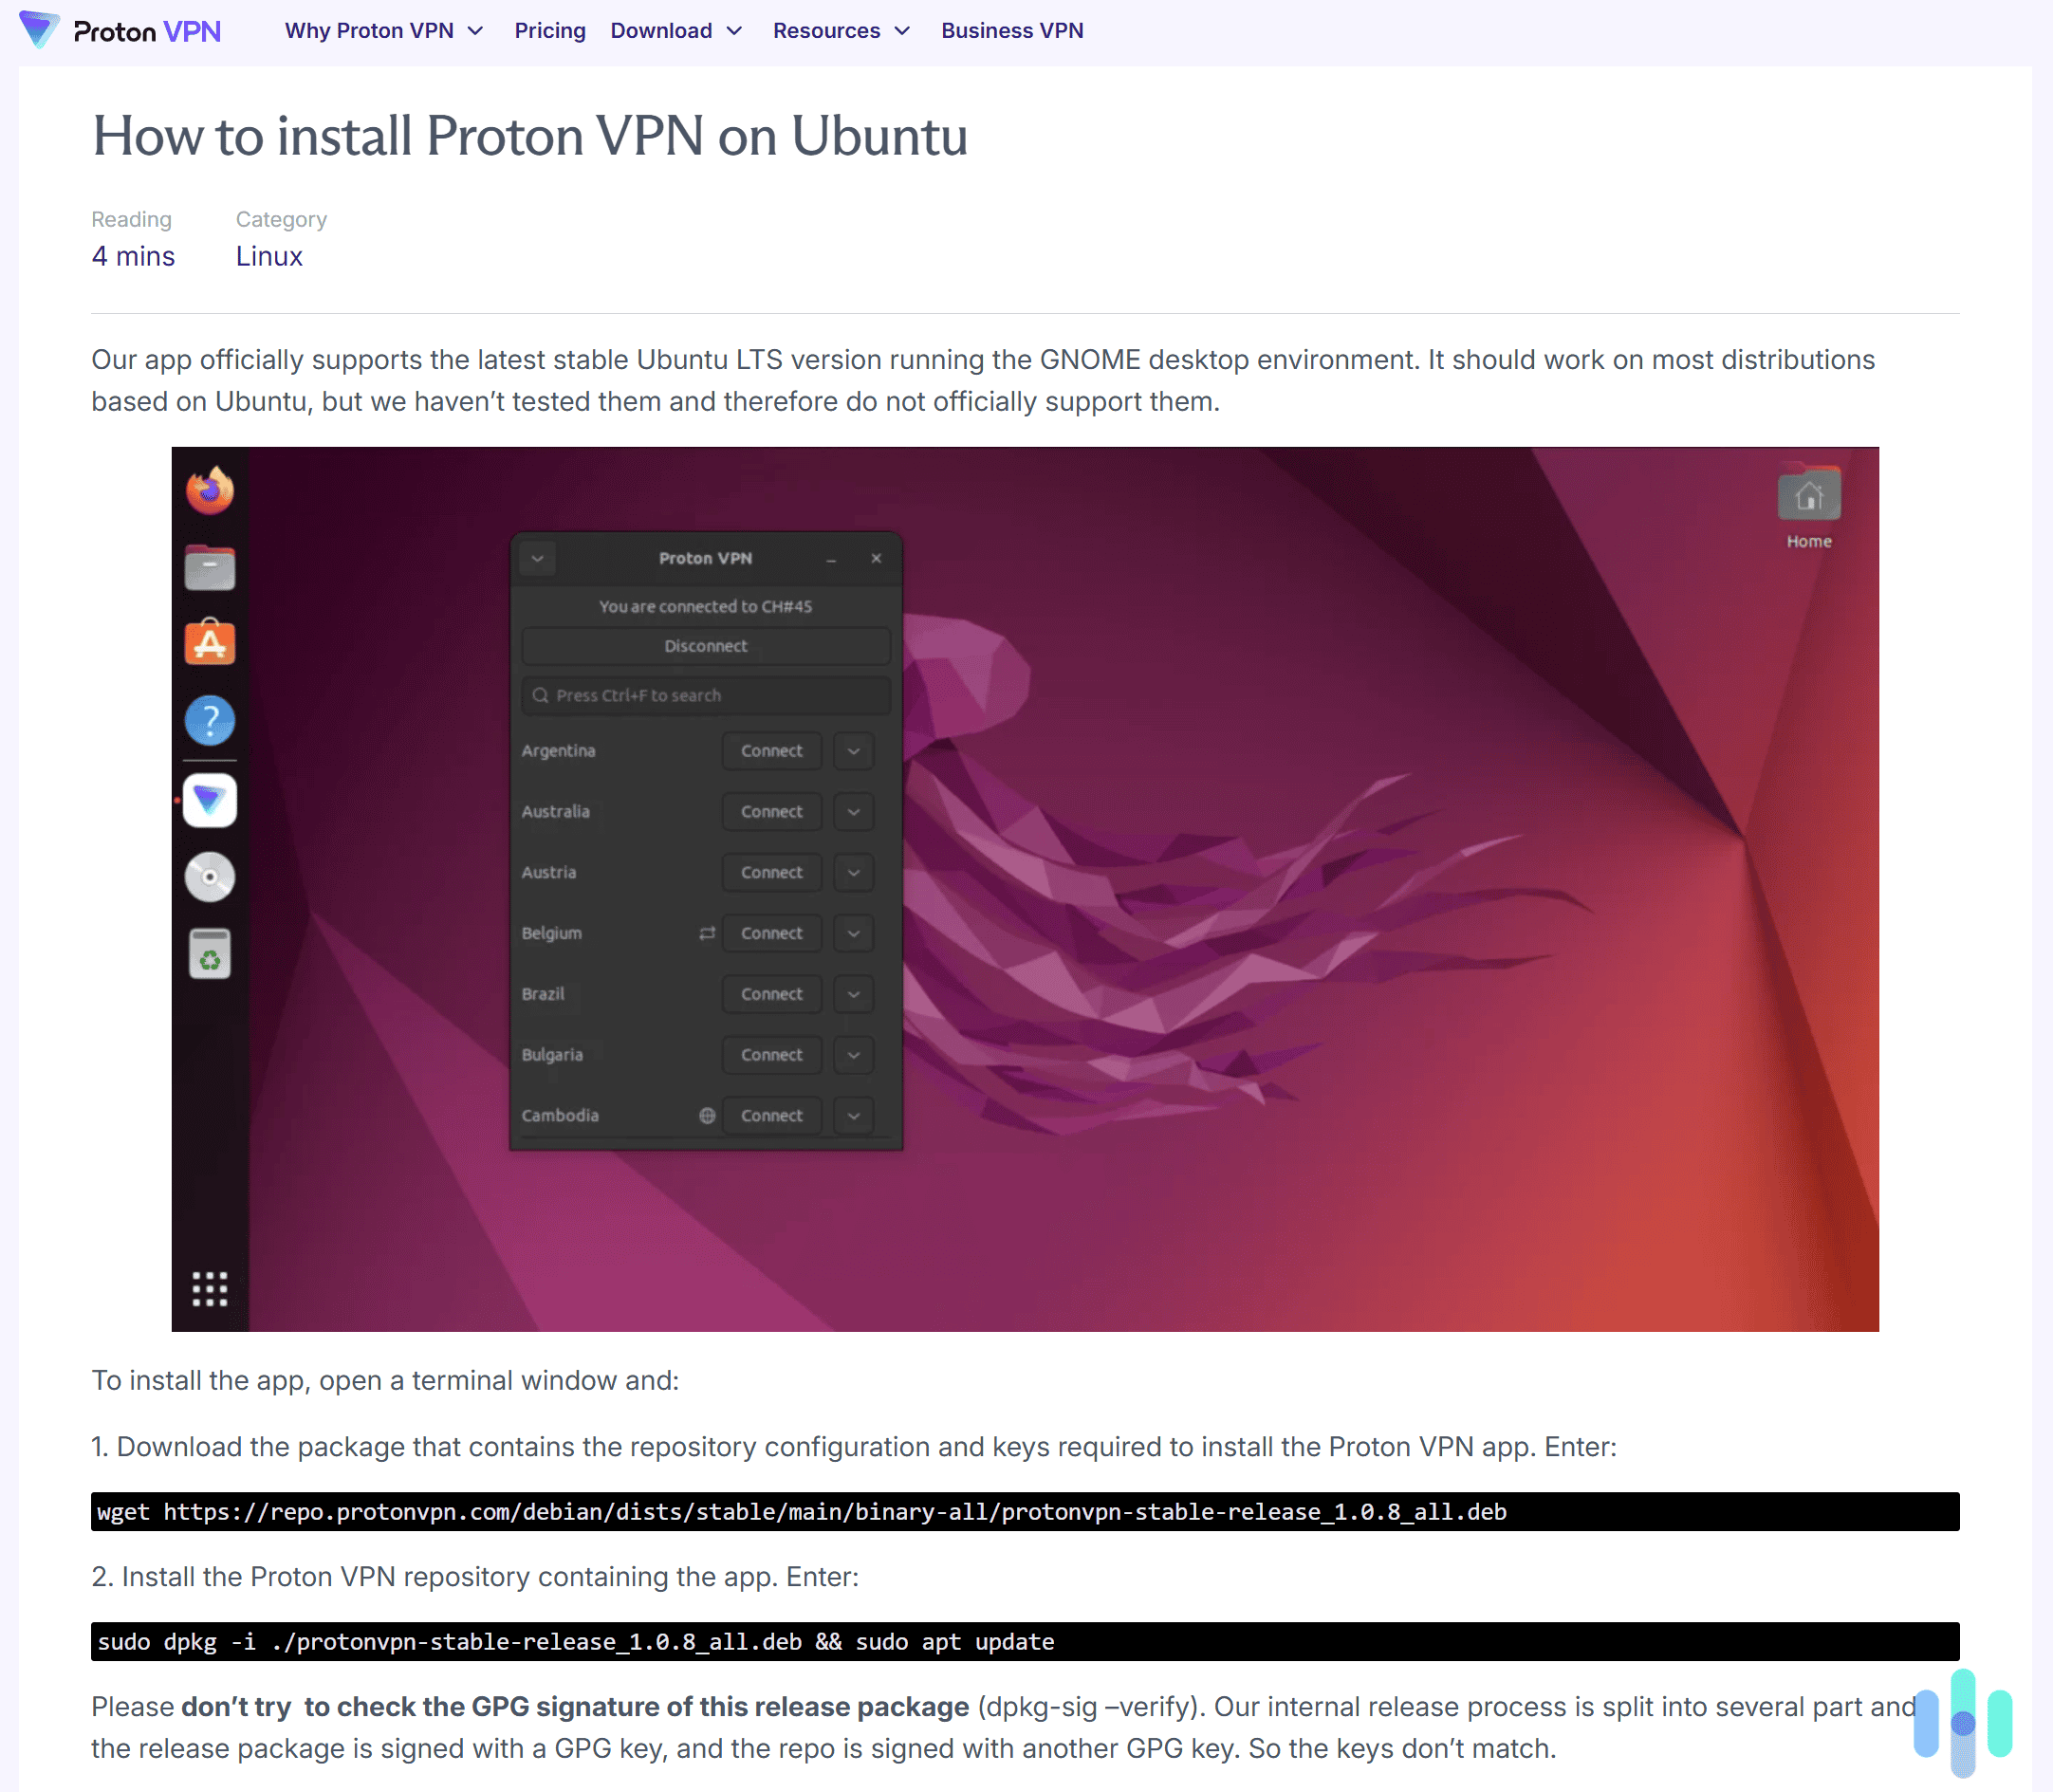
Proton VPN provides a step-by-step installation guide for its Ubuntu app. Proton VPN’s Ubuntu app works on the latest Ubuntu version (currently, 25.04). To install the app, you just have to open a terminal window, and type in a few commands to download and install the app.
We recommend following Proton VPN’s Ubuntu installation guide if you need help. It provides step-by-step instructions, and it also includes helpful screenshots.
What We Like
- Offers a GUI Ubuntu app that’s very beginner-friendly
- Allows torrenting on servers in over 110 countries
- Ubuntu app supports port forwarding for increased P2P speeds
What We Don’t Like
- Has a free version with unlimited data, but it doesn’t allow torrenting or streaming
- Backs all plans with a 30-day money-back guarantee, but it’s prorated
Proton VPN is excellent for torrenting on Ubuntu, as it has P2P servers in over 110 countries. Plus, it supports port forwarding — this connects you to more peers, improving download speeds. In our tests, it increased performance by 15 percent on average.
The VPN also provides very fast torrenting speeds. In our most recent tests, it reduced download speeds by no more than eight percent. For this guide, we used Proton VPN to download a 16 GB file, and it only took around seven minutes.
Proton VPN is also very good for streaming, as it works with over 90 streaming platforms. In our tests, it accessed Netflix, Amazon Prime Video, Disney+, and Max without issues.
-
4. ExpressVPN - User-Friendly Ubuntu VPN with CLI
 View Plans Links to ExpressVPN
Product Specs
Multihop No Obfuscated Servers Yes Kill Switch Yes Split Tunneling Yes Netflix Yes Torrenting Yes 
User Experience
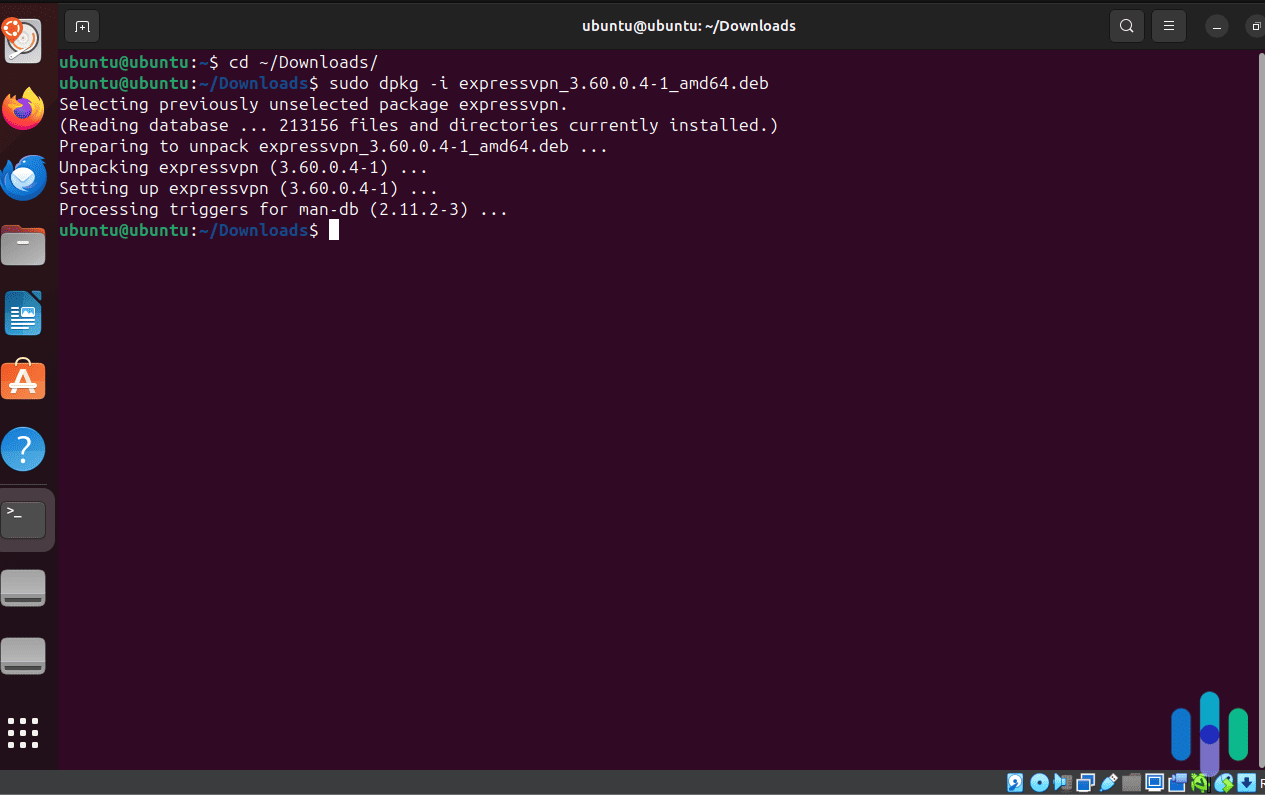
ExpressVPN supports app installation via Ubuntu’s Software Install GUI – at least for the most part. Activating the app still required us to use the Terminal. We downloaded the software package from ExpressVPN, and here’s how we installed it.
- Go to Downloads
- Right-click the ExpressVPN file
- Select ‘Open with Other Application,’ ‘Software Install,’ ‘Select’
- Click ‘Install’
- Enter your Ubuntu system password
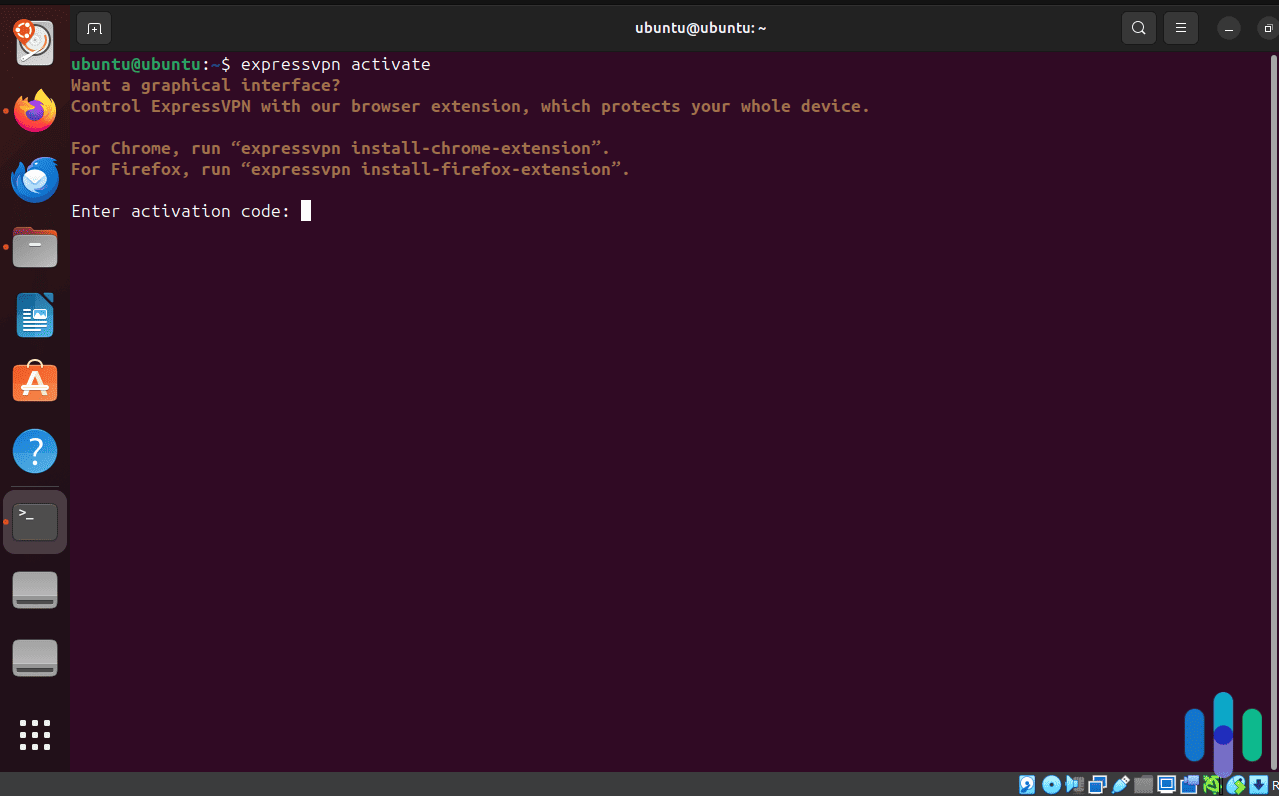
- Activate the app by typing “expressvpn activate” into the Terminal
- Enter the activation code from your account dashboard
Bear in mind that ExpressVPN let us use a GUI only for the installation. We still had to use the Terminal to actually access the VPN. Also, while a GUI is often more user-friendly than a CLI, ExpressVPN’s setup process took longer than that of NordVPN due to the extra steps like activation and authentication. It wasn’t harder to install, per se, but the process was more tedious.
>> Related: How to Set Up And Install A VPN
Security and Privacy
Once installed, we enjoyed plenty of privacy features from ExpressVPN. It was actually rather similar to NordVPN in terms of features. It connected us to the Smart Location (nearest fast server) by default, while giving us the option to choose a specific server if we wanted to. It was actually easier to choose a specific location with ExpressVPN than NordVPN, as we didn’t need to include a server number in the command. For example, to get a UK IP address, we simply typed “expressvpn connect uk” into the Terminal, and it connected us to the fastest available U.K. server at the time.
When it comes to the quality of the connections, we were happy with our results from ExpressVPN. It unblocked websites banned from our office network (like Facebook during office hours), gave us access to different Netflix regions, and hid our real IP address from the websites we visited. Those all point to one thing – ExpressVPN’s tunneling works.
Pricing
ExpressVPN does a lot of things right, but their pricing could be improved. ExpressVPN subscriptions are a little on the expensive side, amplified by the fact that it doesn’t offer subscriptions longer than one year. NordVPN and Surfshark both have two-year plans that, when averaged, cost less than $4 per month. With ExpressVPN, the longest subscription is one year, and it costs $99.95 or about $8.32 per month.
We still think it’s worth it, but just know that you’ll be paying a more premium price for all that ExpressVPN offers.
How To Use
Once we got a subscription, the first thing we did was get an activation code from our account dashboard. It was under ‘Set up your devices.’
From there, we activated our app using the Terminal.
- Open the Terminal
- Type in ‘expressvpn activate’ and hit enter
- Paste the activation code when prompted, and wait for the confirmation
Activating ExpressVPN via the Terminal The great thing about it was that we didn’t need to log in anymore. The activation code is unique to each account (kind of like the license key of antivirus software).
Once activated, connecting was easy. The commands were similar to NordVPN.
- To connect: expressvpn connect
- To disconnect: expressvpn disconnect
- To get a list of servers: expressvpn list
- To connect to a specific location: expressvpn connect [LOCATION] (e.g. expressvpn connect USA)
- To connect to the fastest server to you: expressvpn connect smart
What We Like
- 105 server locations and counting
- Encryption and tunneling that rivals NordVPN
- Supports a GUI setup
- Offers OpenVPN (open-source) and Lightway (proprietary) protocols
What We Don’t Like
- Lack of a subscription longer than one year
- Limited to five to eight (depending on plan) devices
- Takes longer to install with the GUI setup
- Blocks trackers and ads only when VPN is connected
We thought ExpressVPN highlighted one of its greatest strengths – the widespread availability of its servers – in its Ubuntu app. While connecting ExpressVPN to a specific location wasn’t as easy as doing so with Surfshark, the “expressvpn list” command offered a CLI version of Surfshark’s server menu that is well put together.
ExpressVPN installed via CLI That came in handy because as one of our favorite streaming VPNs, we took advantage of ExpressVPN’s 105 server locations to devour as much geo-restricted content as we could on our Ubuntu. Coupled with ExpressVPN’s impressive tunneling, we were able to access different Netflix regions, unblock BBC iPlayer, and watch live programming on YouTube TV. (ExpressVPN is also one of our top YouTube TV VPNs).
ExpressVPN also offers browser extensions for FireFox and Chrome, and if you prefer a GUI, you can actually use the extensions for browsing and accessing those streaming platforms. Just keep in mind that the browser extension encrypts and tunnels traffic only from the browser; it doesn’t affect Ubuntu’s entire networking.
-
5. Private Internet Access - Cheap Ubuntu VPN with GUI
View Plans Links to Private Internet AccessProduct Specs
Multihop Yes Obfuscated Servers Yes Kill Switch Yes Split Tunneling Yes Netflix Yes Torrenting Yes User Experience
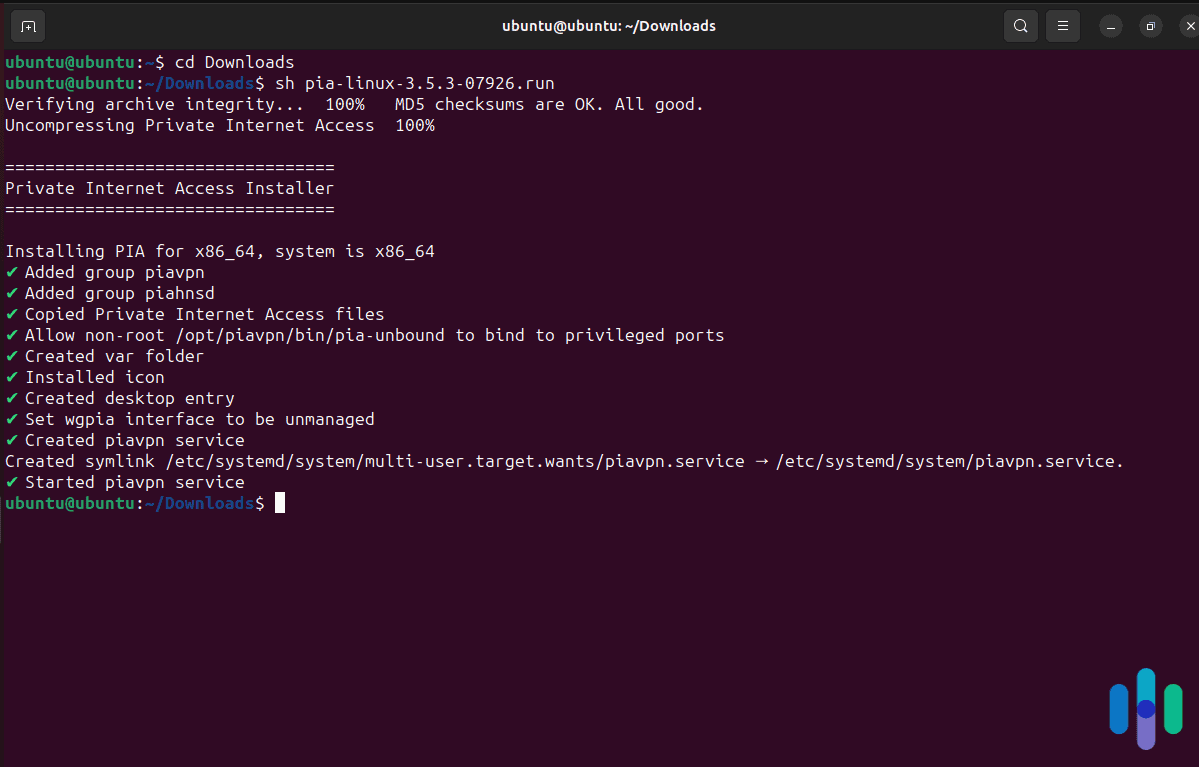
Although Private Internet Access is the most affordable VPN on this list, it’s one of the only two options that provide a GUI. We downloaded the Linux app from the PIA Download page and then set it up using the Terminal. You could also run the Ubuntu Software Installer GUI a la ExpressVPN, but we’ve learned our lesson: It’s much faster to use the Terminal for installing software.
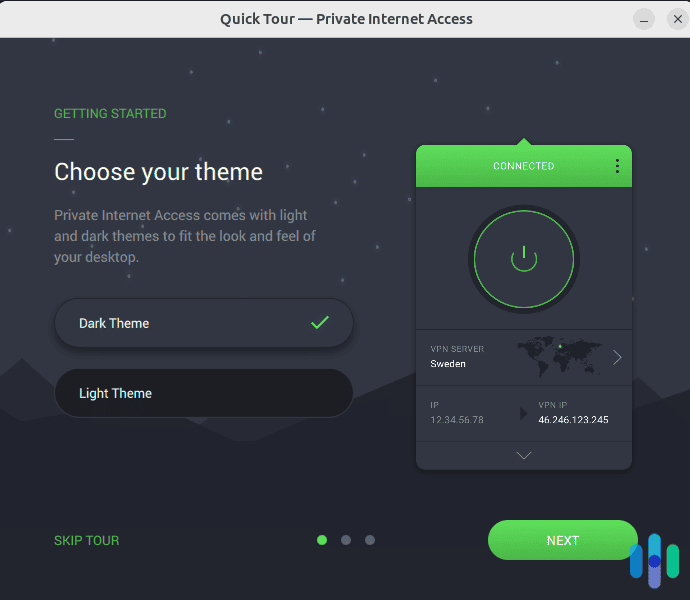
After the installation, the GUI launched automatically. It even gave us the option to take a quick tour; we recommend going through it if it’s your first time using a VPN, as it will teach you some basic VPN how-tos. If you skip it, no problem. Private Internet Access’ Linux GUI offers a similar interface as the Windows and macOS apps, which are as straightforward as VPN apps come.
Security and Privacy
There’s a lot to love about Private Internet Access if you’re a Linux user. One that really stuck with us was how much control it gives users over their VPN connections. Case in point: It’s one of the only handful of VPNs that let you switch between two encryption standards, 128-bit and 256-bit AES.
As you probably know, encryption is one of the main jobs of a VPN, but it’s also the aspect that makes VPNs slowdown your internet connection. And as we saw when we compared VPN speeds, PIA greatly affects internet speeds (particularly the upload speed) when using its most secure encryption standard.
We still recommend using 256-bit AES for absolute privacy, but for things that require a fast connection – for example, if you’re cloud gaming with your Linux machine – switching to 128-bit AES is still a secure but faster option.
>> Related: The Fastest VPNs for Online Gaming
Pricing
The icing on the cake are those affordable subscriptions Private Internet Access offers. Our own plan averaged just $2.19 per month, not counting the three additional months we received at no extra charge. We paid $79 in total for the three-year Private Internet Access subscription. To put that into perspective, we got a VPN subscription three times as long as the $99.95 one-year ExpressVPN plan while paying $20 less. We know a good deal when we see one; that one is.
How To Use
With a GUI, using the PIA Linux app was just as easy as using its Windows and macOS apps. In fact, we’d say that the app shares the same interface as the PIA smartphone apps.
- Log in with your PIA username and password (provided via email after buying a subscription)
- Choose a server from the list of locations
- Click ‘Connect’
It doesn’t get easier any easier than that.
Quick tour of the PIA GUI Aside from connecting, you can also pull up the Settings page from the GUI and access customizations. As we mentioned earlier, you can change how Private Internet Access handles encryption. You can also turn the kill switch feature on and off, choose between WireGuard and OpenVPN, and set up auto-connect rules, among other things.
What We Like
- Affordable pricing starting at $2.19 per month
- Frequent discounts, special deals, and promotions
- Easy-to-use GUI
- Adjustable settings
What We Don’t Like
- The buying process could be more streamlined
- Installation and usage tutorials aren’t very detailed
- Customer service can be a little slow
- Split tunneling is hard to customize, but it works
We discussed NordVPN’s makeshift split tunneling feature earlier, but if you’re looking for an Ubuntu VPN with actual split tunneling, look no further than Private Internet Access.
Private Internet Access installed PIA’s split tunneling feature works two ways. You can set apps, IP addresses, or URLs that always bypass the VPN tunnel or that can connect to the internet only when there’s an active VPN connection. The latter is also called inverse split tunneling, as we explained in more detail in our split tunneling guide.
For example, if you’re using an Ubuntu machine to back-up media files from your other devices, bypassing the VPN makes data transfer faster. To do so, simply find your devices’ IP addresses and enter them into PIA’s bypass field. Now, let’s say you’re also backing up your files from your Ubuntu machine to a cloud server. Since some of those files might contain sensitive information, you want your machine to upload them only when there’s an active VPN connection. To make that happen, just enter the cloud server’s IP address or URL into the inverse split tunneling field.
It might take a while to get Private Internet Access to work exactly the way you want it to, but that’s usually the case with VPNs as customizable as PIA.
-
6. IPVanish - Fast Ubuntu VPN with Minimal Setup Required
View Plans Links to IPVanishProduct Specs
Multihop Yes Obfuscated Servers Yes Kill Switch Yes Split Tunneling Yes Netflix Yes Torrenting Yes User Experience
All the VPNs we’ve discussed so far offer their own VPN apps, but we know that a lot of Linux and Ubuntu users prefer open-source software. If that’s the case for you, IPVanish is a VPN you can set up manually using Ubuntu’s built-in VPN configuration.
First, we downloaded a manual configuration .zip file from IPVanish by typing “cd Downloads/” and then “wget https://configs.ipvanish.com/configs/configs.zip” into the Terminal. From there, we extracted the file (“unzip configs.zip”) to reveal a list of hundreds of VPN configuration files, each one corresponding to a VPN server location (country and city).
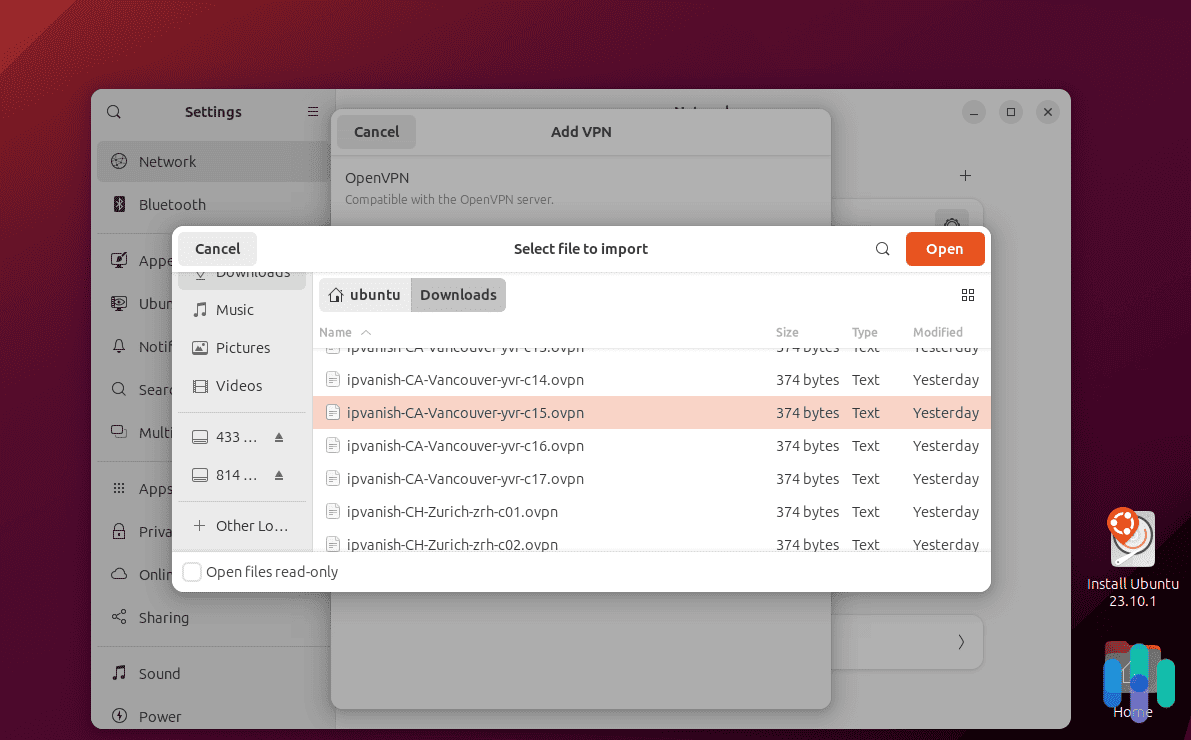
Finally, we went to Ubuntu’s Network Settings to set up a new VPN connection. We imported the configuration file for the location we wanted (use the search feature to make this easier), entered our IPVanish credentials, and finished the setup.
Security and Privacy
Since we used a manual set up, IPVanish didn’t offer much in terms of features out of the box. You could set up networking rules or use a third-party app to control how your VPN connections behave, but that’s beyond our expertise.
What we did was test IPVanish’s connections. All the configuration files we downloaded were OpenVPN files, so no matter which one you use for the setup, your VPN connection will go through an OpenVPN tunnel with 256-bit AES encryption. Of course, we did our own tests to verify that IPVanish was working. We checked that it changed our IP address, performed a WebRTC leak test on our Firefox browser, and saw to it that we got access to websites blocked by our IT guy. All tests showed that Surfshark’s connections were successful.
Pricing
We were able to set up IPVanish without a subscription, but to actually turn it on, we needed an account with an active plan. IPVanish cost $2.99 per month for two years – $71.75 for the entire plan.
It wasn’t the cheapest, but it’s smack right in the middle of the other VPNs we tested. It was slightly more expensive than Private Internet Access and Surfshark, but was more affordable than NordVPN and ExpressVPN.
How To Use
While IPVanish didn’t have a GUI, we easily connected to it through Ubuntu’s system tray.
- Click the system tray (top-right corner)
- If you have only one VPN configuration set up, click VPN to turn it on
- If you have multiple configurations (for example, for multiple locations), select the arrow next to VPN and toggle on the VPN you want to use
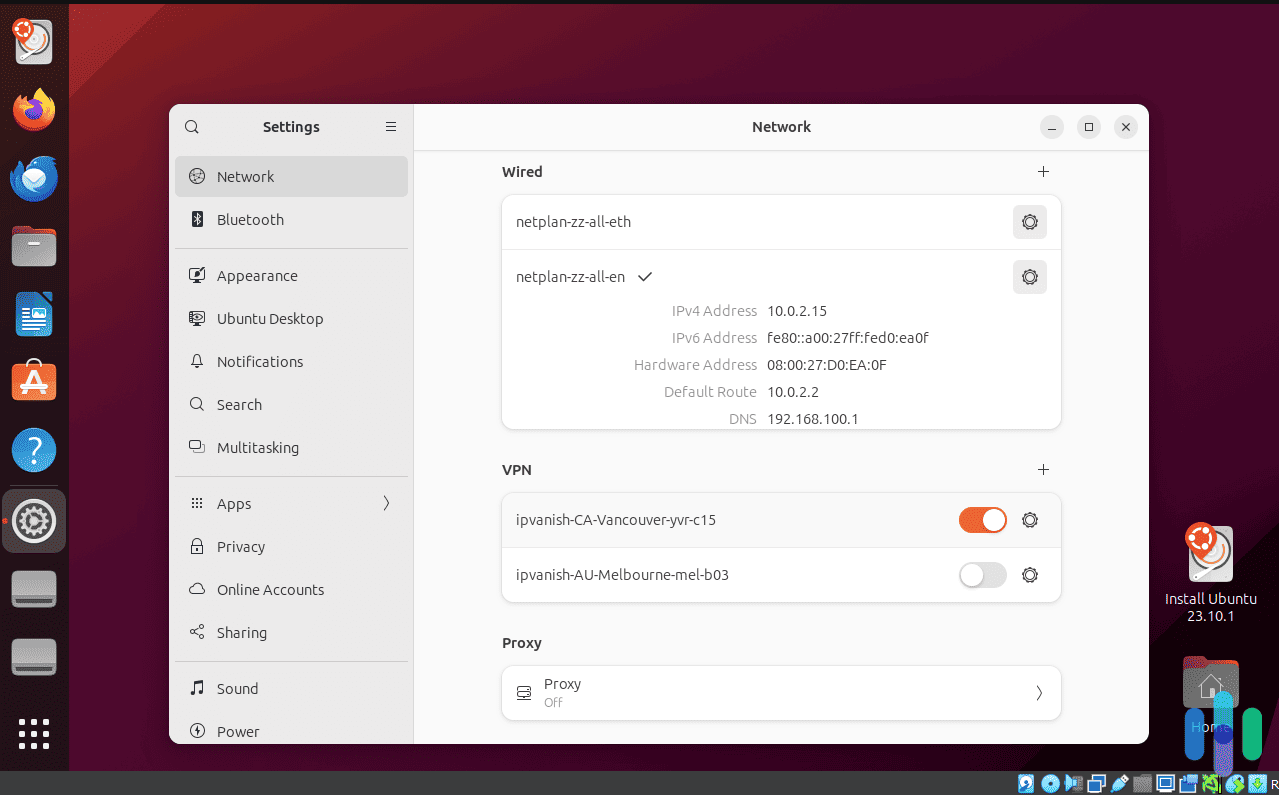
IPVanish manual setup Alternatively, we were able to access and run the VPN from the Settings.
- Open Settings
- Select Network
- Under VPN, toggle on the switch next to your selected VPN location
What We Like
- Easy access using the system GUI
- Hundreds of VPN locations to choose from
- Affordable
- Secure connections via OpenVPN
What We Don’t Like
- Can be a little harder to set up
- Offers no additional features
- No Ubuntu/Linux app at all
- Must repeat setup process to connect to different locations
As a VPN, IPVanish is more than decent. It’s one of the VPNs we use for torrenting due to its wide selection of P2P servers, available in over 70 countries. We’ve also verified that it offers good tunneling, both for normal and P2P VPN connections.
Turning on IPVanish What really stood out, however, was IPVanish’s fast download and upload speeds. It’s one of the fastest VPNs all around. It gave us a near-lossless download speed – from 247 Mbps before we connected IPVanish to 238 Mbps after we connected. That’s a drop of less than 4%.
We recommend IPVanish if you want an easy-to-access and fast VPN for your Ubuntu machine, which can be useful for anything from streaming to gaming.
How To Set Up and Use a VPN on Ubuntu
All the six VPNs we recommended here work seamlessly on most Ubuntu systems – that was the bare minimum requirement. However, they work a little differently from each other.
VPNS With a GUI
VPNs with a graphical user interface run just like a VPN app would on a macOS or Windows system. They are added to the app tray, and when you click on their icon, a window where you can access, control, and manage the VPN pops up.
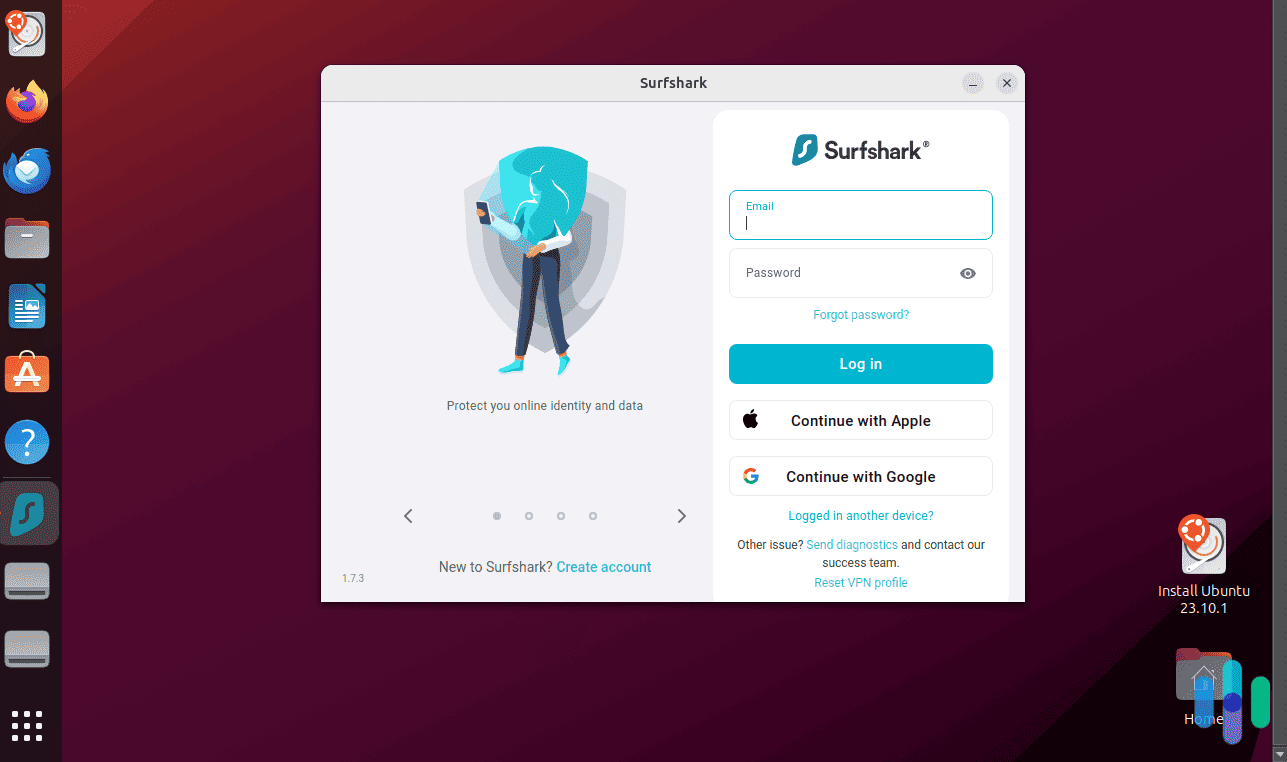
That said, setting up an Ubuntu VPN with a GUI works differently than, let’s just say, setting up a macOS VPN. The steps are the same – you’ll download the app, install it, and then log in – but rather than a system installer, you’ll most likely use the Terminal to install an Ubuntu VPN.
The most obvious advantages of a VPN with a GUI are accessibility and user-friendliness, which is why we recommend picking one if your Ubuntu machine is a laptop or computer. It’s just much easier to access a GUI for day-to-day use.
VPNs With a CLI
In contrast, VPNs with only a command line interface are less user-friendly, but they are often more efficient and customizable. To set up a VPN with a CLI, we recommend using the Terminal, as well. Download the app from the VPN’s download page and then install it. Once that’s done, you’ll have to enter a command into the CLI to log in or authenticate your account (e.g. “nordvpn login” for NordVPN; “expressvpn activate” for ExpressVPN). From there, you’ll have to continue using the Terminal to perform actions like connecting and disconnecting the VPN, choosing a specific server, or turning a kill switch on and off.
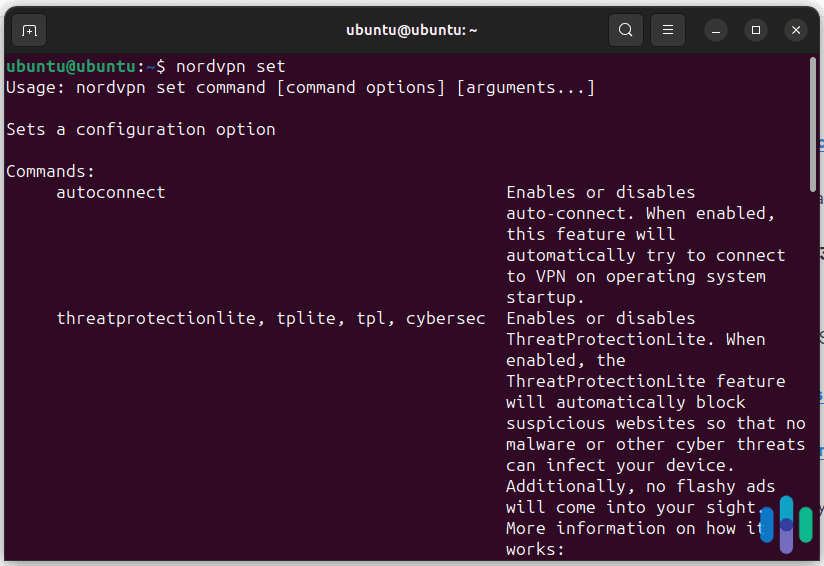
VPNs with a CLI are far less user-friendly than those that offer a GUI, but you’ll often have more control over your VPN. For example, even if a VPN is capable of having a kill switch, if the developer didn’t build that feature into the GUI, you won’t be able to access it. With a CLI, you’re more likely to have access to those types of features.
We recommend using a VPN with a CLI if you can access your Ubuntu machine only via the Terminal. For example, if you’re using it as an email server, a virtual private server, or proxy server for your devices.
>> Related: VPNs vs. Proxy Servers – What’s The Difference?
Are There Any Free Ubuntu VPNs?
There certainly are; however, keep in mind that they may be able to offer only a limited set of features. For example, they may offer limited monthly data (e.g. up to 10 GB per month), limited speed, or limited servers. We actually don’t recommend going with a free VPN for an Ubuntu system because it’s harder to keep track of those limitations, especially if only a CLI is available. One minute you’re connected, the next minute you’re not, and you might not even realize it. That can put your privacy at risk.
Rather than a free VPN, we suggest getting a VPN free trial. In most cases, you can get a 30-day money-back guarantee. For example, you can sign up for a Surfshark subscription, and pay the initial one-month fee. If you don’t like it, you can cancel and request a refund, and then try again with a different VPN until you find the one that works best for you.
Other VPNs also offer free trials on iOS and Android that you can sign up for (usually three to seven days) and once you’re in, you can use your login credentials on any device. Just make sure to cancel before the trial period is up to avoid getting billed.
That said, if you absolutely must use a free VPN, you could do a lot worse than Proton. There’s a user-friendly app for Ubuntu – and the basic version costs exactly zero dollars.
>> See More: The Best Free VPNs (Tested Safe!)
Is It Safe To Install a VPN Using Third-Party Software?
Aside from installing VPNs by following instructions from the manufacturer, there are third-party apps you can use to set up software on your Ubuntu. Are they safe?
Well, some of them are, but not all. As a general rule of thumb, we always recommend going with the instructions from the VPN company itself. They know their software and VPN architecture better than anyone else, after all. If the VPN doesn’t offer software for Ubuntu (or for the version of Ubuntu you’re running), the next best option is to use the built-in network manager where you can import a VPN configuration to set up a connection.
Conclusion: When Should I Use a VPN?
Given the versatility and customizability of Ubuntu, there are millions of possible scenarios where a VPN could prove useful. When you’re browsing on your Ubuntu desktop’s browser, use a VPN. When you’re uploading traffic to a secure cloud, use a VPN. When you’re downloading via a P2P connection, use a VPN.
We can’t possibly list all the use cases of a VPN here, but a good general rule to follow is to use a VPN whenever you connect your Ubuntu machine to the internet. And that goes for other devices, too, from your mobile phones and tablets to your laptops and even smart TVs. The good news? All the VPNs we listed above support a wide range of devices; not just Ubuntu. One subscription is all you need to protect your entire digital life.
FAQs
Want answers to your most frequently asked questions about the best VPNs for Ubuntu. Take a look below.
-
Is there a free VPN for Ubuntu?
There are free VPNs available that work with Ubuntu. Both Hotspot Shield and ProtonVPN work will Linux-based systems including Ubuntu, and both offer free versions of their VPN. Both come with significant limitations, such as limited bandwidth and limited devices. In addition, you might check out Surfshark’s one week free trial. Surfshark is another VPN that works well with Ubuntu, and its trial is full-service, though, of course, it lasts only for seven days.
-
Which VPN is best for Linux?
The best VPN for Linux is NordVPN, which not only offers the best security in the business, but also has great features like split tunneling and torrenting. Other great Linux VPNs include Surfshark, Proton VPN, ExpressVPN, Private Internet Access, and IPVanish.
-
Can I install a VPN in Ubuntu?
You can install a VPN in Ubuntu. How you do this will depend on which version of Ubuntu you have and what VPN you’re using. With some VPNs, you must first download the OpenVPN protocol and install it. You then use OpenVPN to connect to your chosen VPN service. Many VPNs, though, such as ExpressVPN, make things easier by providing Linux-based app so all you need do is download the app and install it.
-
Is ExpressVPN free?
ExpressVPN does not offer a free version of its service. However, if you’re looking to try the VPN out with no strings attached, ExpressVPN offers a 30-day money-back guarantee. This means that you can essentially use the service for free and see if it works for you. If not, you’ll owe nothing, just as long as you remember to cancel before your 30 days are up.
-
Are there open source VPN protocols?
Two of the most popular VPN protocols, Wireguard and OpenVPN, are open source.
-
StatCounter. (2023). Desktop Operating System Market Share Worldwide.
gs.statcounter.com/os-market-share/desktop/worldwide/#monthly-202211-202311 -
Ubuntu. (2023). Reduce development cost for the open source smart home with Ubuntu.
ubuntu.com/internet-of-things/smart-home -
Ubuntu. (2023). Download Ubuntu Desktop.
ubuntu.com/download/desktop -
VirtualBox. (2023). Download VirtualBox.
virtualbox.org/wiki/Downloads -
Surfshark. (2023). Surfshark’s no-logs statement gets verified by Deloitte.
surfshark.com/blog/deloitte-audit-nologs -
Ubuntu Kylin. (2023). Home.
ubuntukylin.com/index-en.html -
NordVPN. (2023). NordVPN Linux client.
github.com/NordSecurity/nordvpn-linux

